Producing H.264 Video
H.264 is the most widely used codec today, whether for streaming via Flash or Silverlight or for the Apple iPod, iPhone, and iPad product lines. If you've worked with H.264 before, the format is old hat for you. But if you're cutting over from VP6 or Windows Media or expanding distribution to H.264-compatible devices, you're faced with a learning curve.
Well, we're here to help. In this article, I'll detail what you need to know to produce H.264 files for streaming or device playback. Our target reader is the novice working with encoding tools such as Adobe Media Encoder, Apple Compressor, Sorenson Squeeze, and Telestream Episode Pro. If you're looking for help with more advanced tools, they simply provide too many options to address in an introductory article.
What's Your Profile?
With H.264, it's critical to adopt Stephen Covey's advice: "Begin with the end in mind." That's particularly true with device  playback, because if you produce a file incorrectly, it won't load or play on your target device.
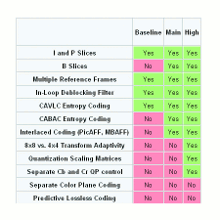
From a compatibility standpoint, the most important encoding parameter compatibility is profile. This defines a set of encoding techniques that can be used to create the encoded file. The H.264 standard defines 17 different profiles, with the three most relevant to streaming shown in Figure 1, a table adapted from one presented by Wikipedia (http://en.wikipedia.org/wiki/H.264). As you can see, the encoding techniques are presented on the left, and each successive profile deploys additional techniques to produce the encoded file. This produces a higher-quality file but also one that's harder to decode.
Why 17 profiles? Because they serve as convenient compatibility points for hardware developers and video producers. For example, Apple designed the iPod to play H.264 video produced using the Baseline profile, balancing factors such as CPU and memory cost as well as LCD resolution. If you're producing video for the iPod, so long as you encode using the Baseline profile (and the appropriate level, discussed later), the file will load and play on the iPod.
Accordingly, rule No. 1 for H.264 encoding is to know the highest profile supported by the playback device you're targeting. Fortunately, most manufacturers, particularly Apple, do a nice job laying out these specs in their product materials, so check their website first.
The other H.264-related parameter that you'll typically see on these spec pages is the "level." For example, according to Apple's website, the iPad will play "H.264 video up to 720p, 30 frames per second, Main Profile level 3.1." By way of explanation, levels further subdivide the profile regarding parameters such as resolution and data rate. If you visit the H.264 page on Wikipedia, you'll learn that level 3.1 for the Main Profile has a maximum bitrate of 14Mbps and maximum resolution of 1280x720p. If you exceed these specs on a file destined for the iPod, you run the risk that iTunes will kick the file back out during the syncing process.
So, when producing for devices, once you know the profile and level, you have a pretty good idea how to encode your video. What about when producing for computers?
Producing for Flash and Silverlight
Both the Flash and Silverlight players can play H.264 files encoded using all three profiles, so unless you're attempting to produce a file that plays on both computers and other devices, use the High Profile. Typically, when you're producing for computers, levels are irrelevant, since the relevant player doesn't check the level before attempting to play the file. Instead, the most relevant considerations for computers are the resolution and data rate of the actual video file, which will determine whether that computer can play the file smoothly.
To explain, if you try to play a 1080p file produced at 12Mbps on a Pentium 4-based computer, chances are the file won't play smoothly. This, of course, has nothing to do with profile or level; there are simply too many pixels for the older computer to push. So, where producing for devices is all about meeting the designated profile and level, producing for computers is all about the configuration of the compressed video file, which I discuss in more detail later.
For this reason, most encoding tools don't let you select a level, and some, like Telestream Episode Pro, let you click a check box to automatically adjust the level to match the selected encoding parameters. Occasionally, with tools like Adobe Media Encoder, which does allow you to restrict encoding to a designated level, you may get an error message if you attempt to encode using parameters that exceed that level.
For example, if you set the level at 3.1 for the High Profile and attempt to encode at 1080p, Adobe Media Encoder will let you know that you've exceeded the parameters for level 3.1. If you really want to produce that file, you simply boost the level setting to level 4, and Adobe Media Encoder will produce the file.