Tutorial: Adobe Media Encoder CS6--UPDATED!
The new version of Adobe Media Encoder, included in the just-released CS6 collection as well as as a standalone product, offers significant improvements in usability and performance, as well as new features. Here's what you need to know about it.
Page 1
With Adobe Media Encoder CS6, Adobe dramatically improved both the program's usability and performance. This tutorial demonstrates the new features as well as providing an overview of how to use the product, which serves as the encoder for Premiere Pro and After Effects, as well as a standalone encoding tool.
The video below covers Media Encoder's integration with Premiere Pro and After Effects, as well as using presets, the queue window, and the watch folder for multiple encoding jobs. New presets include most Android devices, TiVo, DVD, Blu-ray, broadcast, mobile, tablets, and of course generic web video presets as well as presets specifically for Vimeo and YouTube.
Additionally, the tutorial looks at how Adobe Media Encoder CS6 stacks up against other encoding tools for single-file DV and HD encodes, as well as multiple parallel outputs from a single DV or HD file.
With Adobe Media Encoder CS6, Adobe dramatically improved the program's usability, and especially performance. In this tutorial, I'll demonstrate all new features and provide a general overview of the operation of Adobe Media Encoder CS6.
As an overview, Adobe Media Encoder, shown in Figure 1 (below), functions as an encoding engine for Premiere Pro, and for After Effects, as well as a standalone encoder.
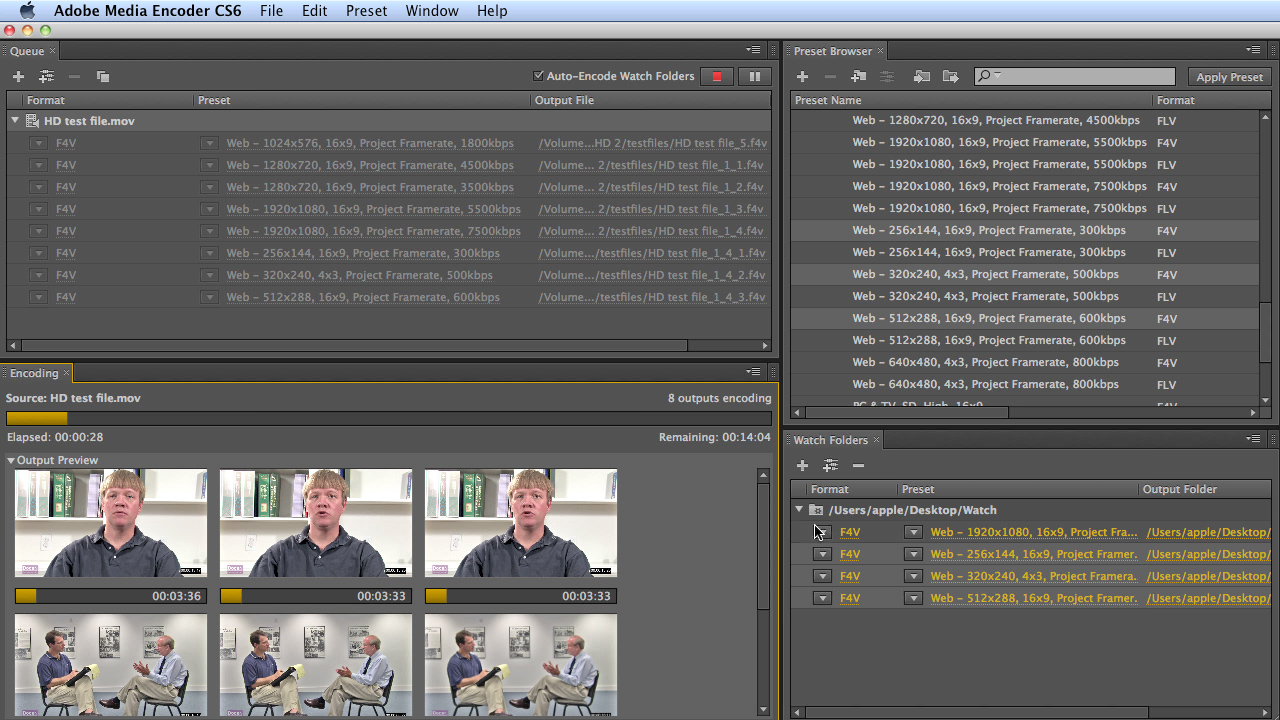
Figure 1. Adobe Media Encoder CS6 in a nutshell. New Presets Browser (upper right) and parallel encoding (lower left).
Exporting Files to Adobe Media Encoder
So when I'm producing a file for streaming and encoding, I would create the file as normal in Premiere Pro, and then choose File > Export Media, and that gets me to the Export Setting dialog from the Adobe Media Encoder (Figure 2, below).
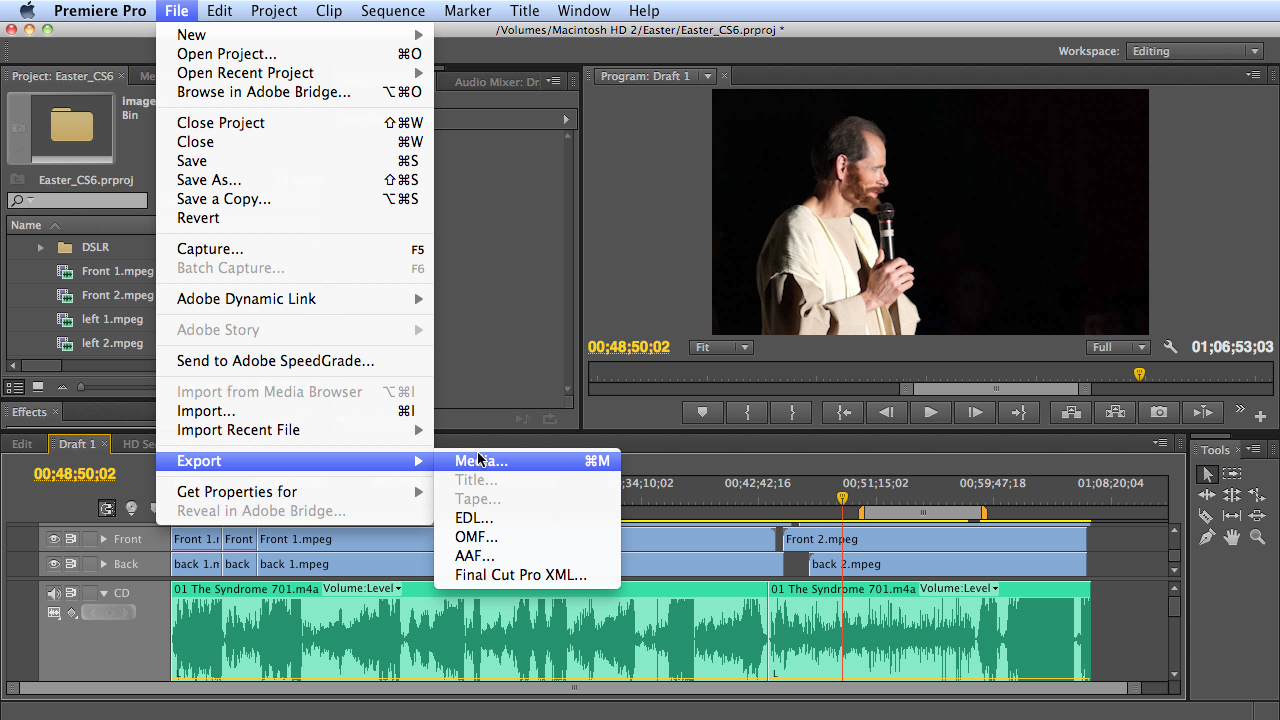
Figure 2. You can access Adobe Media Encoder from Premiere Pro (and After Effects the same way).
If I click Queue, it's going to show up here in the Queue window, and will get encoded to this preset, as soon as I press the Start Queue icon. It also functions very similarly from Adobe After Effects: You would export a composition to Adobe Media Encoder.
You can also add a source file directly, as shown in Figure 3 (below). Let's add an NHD file, and let's delete the sequence from Adobe Premiere Pro. We'll just remove that.
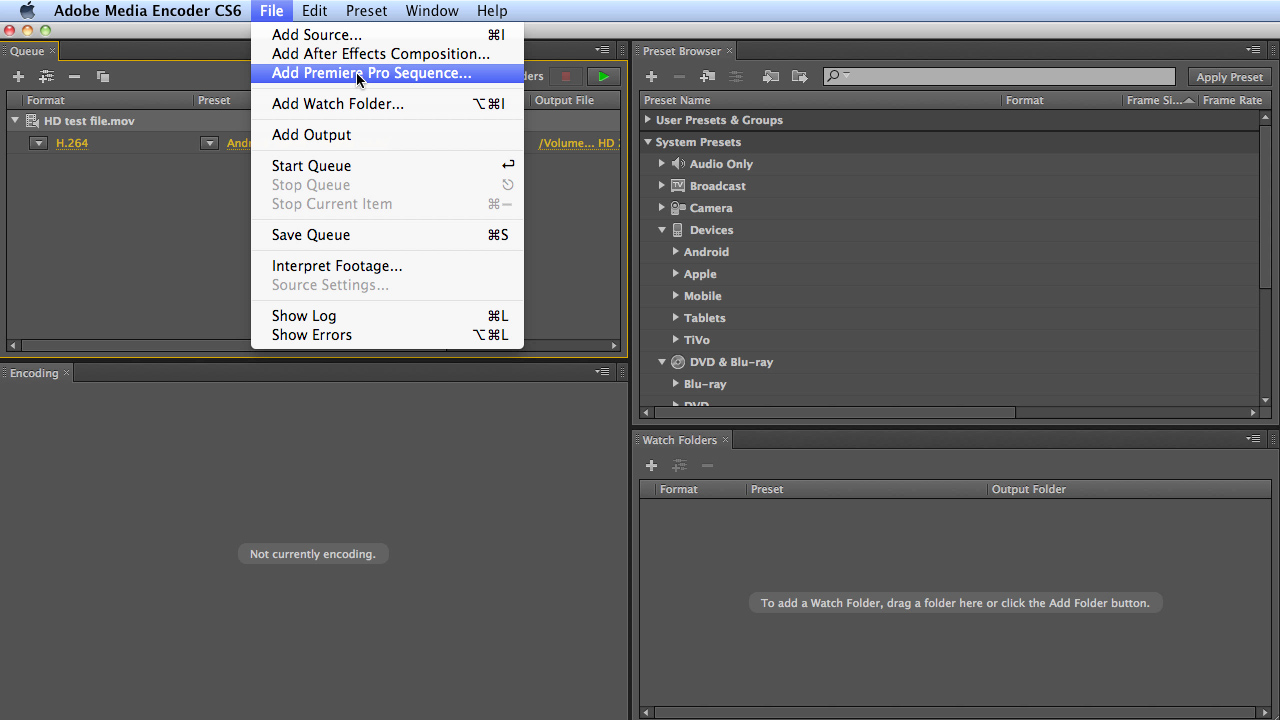
Figure 3. You can also load files, sequences and compositions directly into the Adobe Media Encoder for completely standalone operation.
And you can also add an After Effects composition or a Premiere Pro sequence directly from within the program.
Creating a Watch Folder
In addition to creating entries in the queue window, you can also create a watch folder. Watch folder is any folder on your hard drive that you designate as a watch folder. You select the folder here, and then any files that you drop into the folder will be encoded to the selected preset or presets, once the file's dropped in.
Then it's automatic operation. Anybody can access that folder in a shared workgroup setting that can be a lot of different people on a LAN, connects us to the encoding that's provided by Adobe Media Encoder. Watch folder operation is a very, very powerful feature for shared use of Adobe Media Encoder.
Using the New Presets Browser
Once I click the Start Queue icon, then encoding starts. Now all that's pretty similar to how the Adobe Media Encoder worked in previous versions of the Creative Suite, and previous versions of all products that it's included with. What's new in the product is the Presets Browser (Figure 4, below).
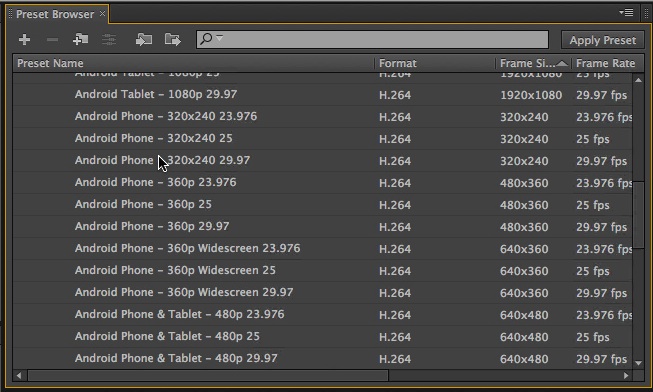
Figure 4. The new Presets Browser makes presets easier to find and apply, and Adobe added lots of Android presets.
Now not only are there tons of new presets, it also operates a little bit differently and it's a little more convenient to add presets to the Queue window or to a watch folder. The presets have been reorganized, with presets for broadcast, H.264, MPEG2, and MXF. You've got camera presets if you want to create video to send back to a camera. You've got a bunch of device presets, and many of the Android presets are brand new. Adobe has always done a pretty good job with Apple presets, and has updated them with a few new ones in this version. You've also got generic presets for mobile, tablets, and TiVo. You've got DVD and Blu-ray presets (H.264 and MPEG2). There are also presets for image sequences.
As for web presents, the three main categories are Flash, including F4V, which is H.264; and FLV, which is VP6. And you've got a lot of presets for both Vimeo and YouTube. In the images you see in this tutorial we're looking at the Mac version of the product. If you were looking at the Windows version, you would have presets for Windows Media (WMV) encoding as well. Those are the new presets and they're conveniently organized in the Presets Browser.
Loading Multiple Presets Simultaneously
The other cool thing you can do is you can load multiple presets at one time. If I select the presets shown in Figure 5 (below), hold down the Command key, and then drag those onto the test file and we've got encoding for 7500Kbps, 5500Kbps, 3500Kbps, and 4500Kbps. I can add and tweak multiple different presets for the same encode.
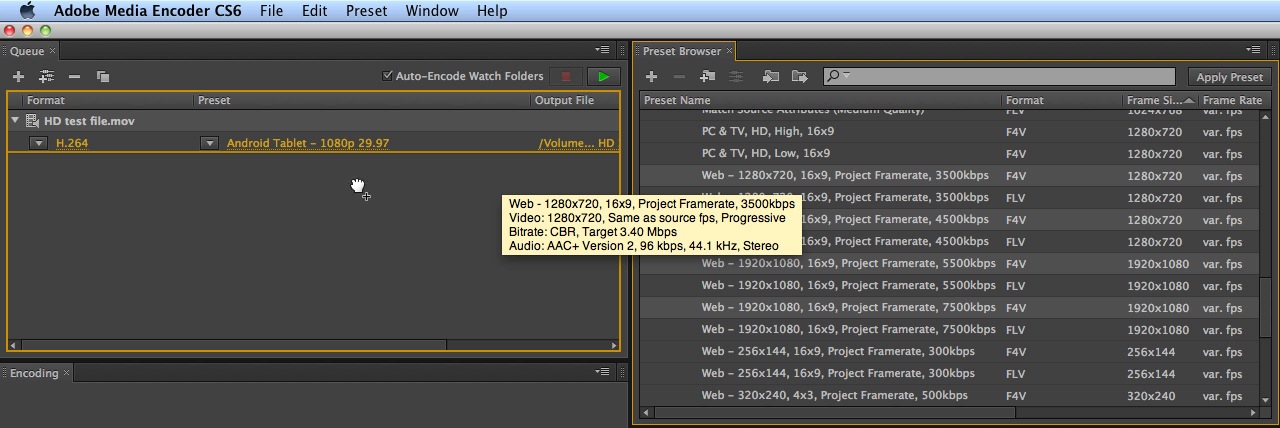
Figure 5. Adding multiple presets to an encoding job.
Operation works identically with watch folders. If you want to encode a single watch folder to multiple active presets, you just drag them on (Figure 6, below). In previous versions of Adobe Media Encoder, you'd have to manually add a separate line item for adding a preset to the encoding batch. In this case, you can drag multiple presets onto the file and then you get multiple encodes. It's not a huge timesaving, since you still have to wait for the encode to finish, but it is a lot more convenient.
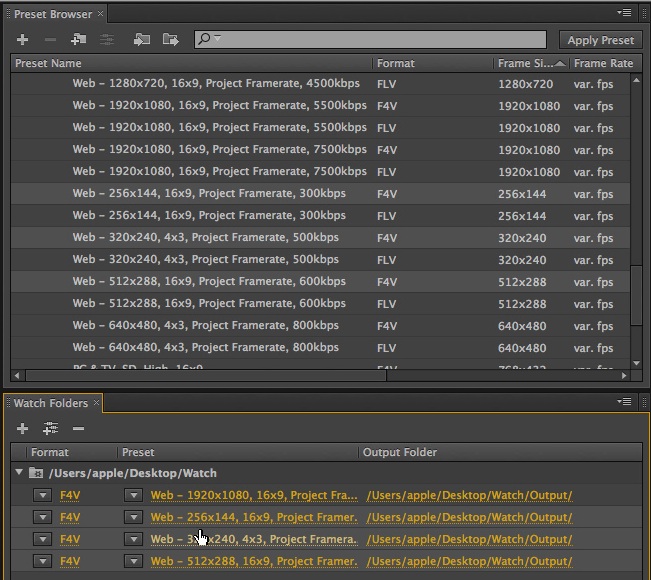
Figure 6. You can create multiple watch folders each with multiple presets.
Parallel Encoding
Now the biggest new feature in Adobe Media Encoder CS6, from my perspective, is parallel encoding. In previous versions of the Adobe Media Encoder, the application functioned serially. So it would encode this file first and then this file and then this file, and then this file, which really wasn't all that efficient, if you had a multicore computer.
In version CS6, Adobe Media Encoder encodes in parallel; in my test project for this tutorial, that meant I saw eight different encodes of the same source file going at once (Figure 7, below).
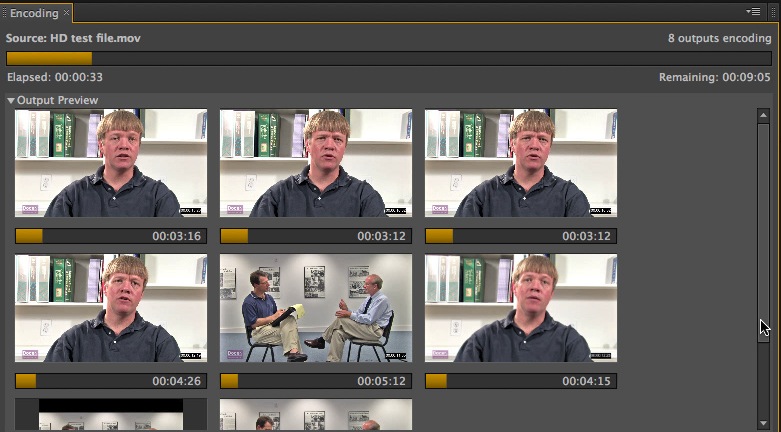
Figure 7. AME now does parallel encoding for one-to-many jobs...
Encoding 8 video streams at once makes my ystem a bit sluggish, since we're using just about 100 percent of system resources (Figure 8, below). But if you've got a multiple-core computer, like my 8-core Mac Pro, you'll get very efficient encoding.
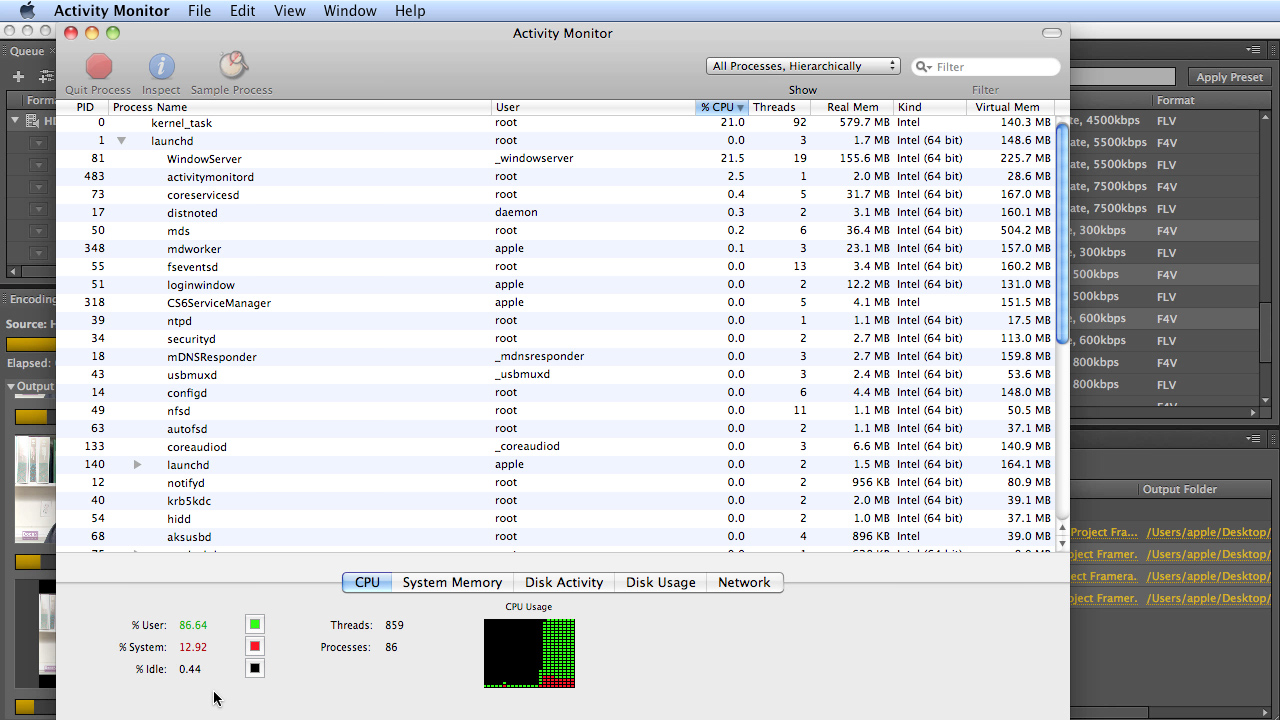
Figure 8. ...which consumes all available resources on this 8-core Mac Pro...
Benchmarking Adobe Media Encoder CS6
So how does this look from a benchmark perspective? Earlier this year I ran some tests that I put together for Streaming Media East, for a presentation I gave there in May 2012. I looked at 4 different encoding scenarios, starting with a single file-to-single file output. Parallel encoding doesn't help you here, and Adobe Media Encoder turned out to be the slowest of the tested applications (Adobe Media Encoder, Sorenson Squeeze, and Telestream Episode). Because these were single file-to-single file encodes, the parallel processing wouldn't have helped.
But in a single file-to-multiple outputs scenario for the same 6-minute file used in the previous test, Squeeze was 4:06, Episode was 13:44 and Adobe Media Encoder was 2:11 (Figure 9, below).
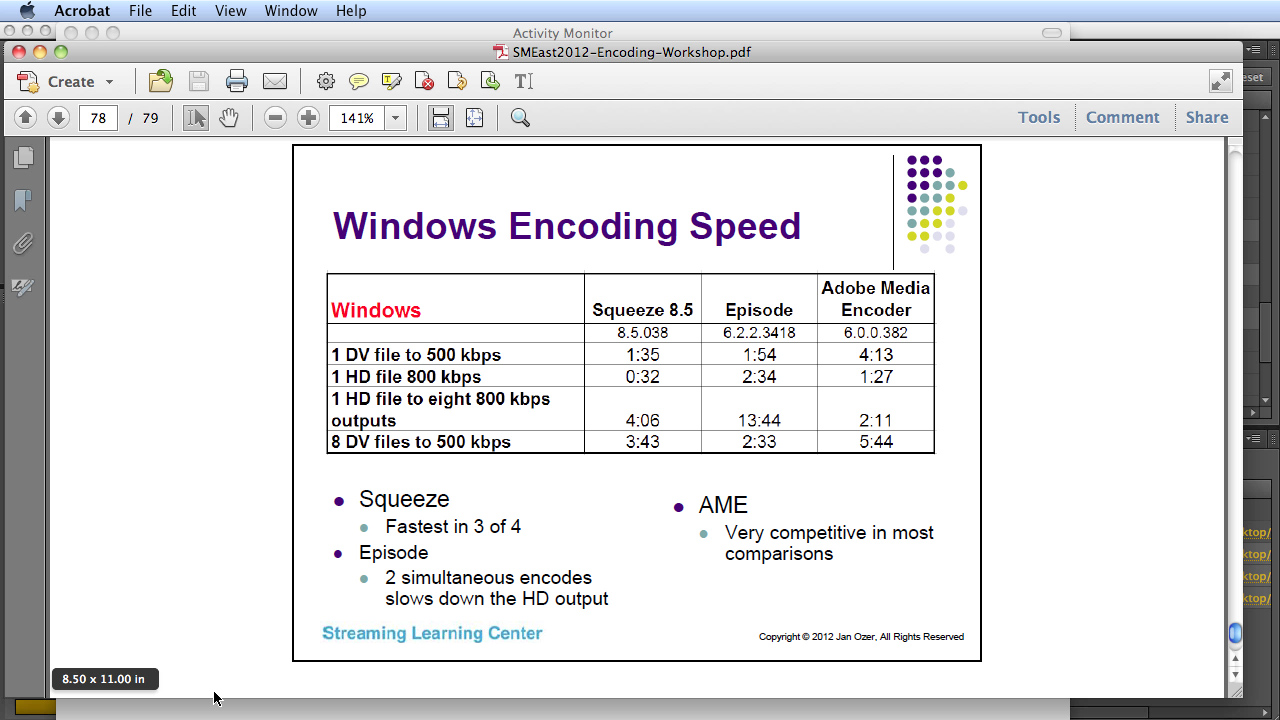
Figure 9. ...and makes AME the fastest encoder in one-to-many jobs (line 3).
So this is the real sweet spot for the new Adobe Media Encoder, and it's a very relevant sweet spot, because a lot of producers are starting to encode a single source file to multiple outputs.
So that's Adobe Media Encoder CS6. The new Presets Browser makes its growing family of presets a lot easier to find and apply, while parallel encoding really speeds one to many encoding scenarios.
Page 1
Related Articles
Adobe Premiere Pro Instructor extraordinaire Luisa Winters explains how to use the new and enhanced Multi-Camera Monitor for quick and efficient multicam edits in Adobe Premiere Pro CS6 in this video and text tutorial.
A key concern for any producer is to ensure that the work you produce will play back on as many platforms (online, mobile, broadcast) as possible. Until recently, delivering content in digital cinema environments was the exclusive province of high-end facilities with specialized equipment. But with the release of Adobe Media Encoder CC 2014 and its Wraptor DCP plug-in, DCP has become just another export option, putting digital cinema delivery well within the reach of any Adobe CC user. Here's how you can add it to your offerings when your clients or projects demand it.
Two types of noises degrade the audio you shoot with your video: random noises like microphone clicks and pops, and consistent noises like white noise or air conditioning hum. This tutorial demonstrates how to remove both of them in Adobe Audition CS6.
Jan Ozer sits down with Bill Roberts to discuss the trends impacting the future direction of Adobe Creative Suite for video pros, including the decline of 3D, the rise of 4K, and second-screen viewing. Other topics included the growth of Creative Cloud, and the development arc of Apple Final Cut Pro X.
In this tutorial you'll learn how to maximize the brightness and contrast of your video in Adobe Premiere Pro CS6 using the Brightness, Contrast, and Gamma Correction controls for effective and balanced adjustments.
Video encoding and editing expert Jan Ozer provides three useful tips that will enhance your workflow and get you out of some editing jams in your Adobe Premiere Pro projects: editing audio without unlinking; Fill Left and Fill Right to create stereo audio; and creating nested sequences for smoother edits and creating reusable set pieces in your projects.
There have been lots of comparisons between Final Cut Pro X and Premiere Pro CS6, with most focusing on features and workflows. This article discusses a series of multiple-format benchmark tests that analyzed comparative performance between the two programs.