Tutorial: How to Composite PowerPoint and Talking Head Video in Telestream Wirecast
Any time you produce a webinar that's got PowerPoint and a talking-head video, it's helpful to present them in the same video frame. This tutorial explains how to composite these two sources in Telestream Wirecast.
Any time you produce a webinar that includes PowerPoint and a talking head video, it’s nice to present both in the same video frame. In this tutorial, I’ll explain how you accomplish that in Telestream Wirecast.
The project shown in this tutorial has three inputs that I'll configure like the frame on the left in Figure 1 (below). I’ve got the PowerPoint slides from a MacBook Pro running on the same network as the HP Z400 I’m using to create and stream this presentation. The slides are coming in via the Telestream Desktop Presenter Module, which basically lets any Mac or Windows computer on the same network as the encoding station input the screen, or any portion of the screen, plus audio, into Wirecast.

Figure 1. This webcast will combine 3 sources--video, audio, and PPT--as identified in this screen in a composited frame like the one shown on the left. (To see this image, or any in this article at full size, just click on the image.)
The video on the left in Figure 1 is via a ViewCast Osprey 820e capture card that’s capturing HDMI video and audio input from a Panasonic AVCHD camcorder. So this shot has two visual elements, and three total elements: the PowerPoint, the video, and the audio.
Building the Composite Image
Let’s see how I built that composite image. To begin, click on the page icon in the panel just below the program window on the left to add a new shot (Figure 2, below), and a blank thumbnail image appears in the menu below, to the right of the other elements we’ve already added.

Figure 2. Adding a new shot.
Click the thumbnail and choose Rename, and then type the name of the shot in the dialog that appears. We’ll name this one “Webinar Composition” (Figure 3, below).

Figure 3. Naming the shot.
Next, double-click the frame to load it into the editor, and you’ll see the array of templates shown in Figure 4 (below). Obviously, the easiest thing to do is to choose a template that closely matches your desired output, which is the side-by-side video shown selected in Figure 4.

Figure 4. Choosing a side by side-video template from the options available in the Template Chooser.
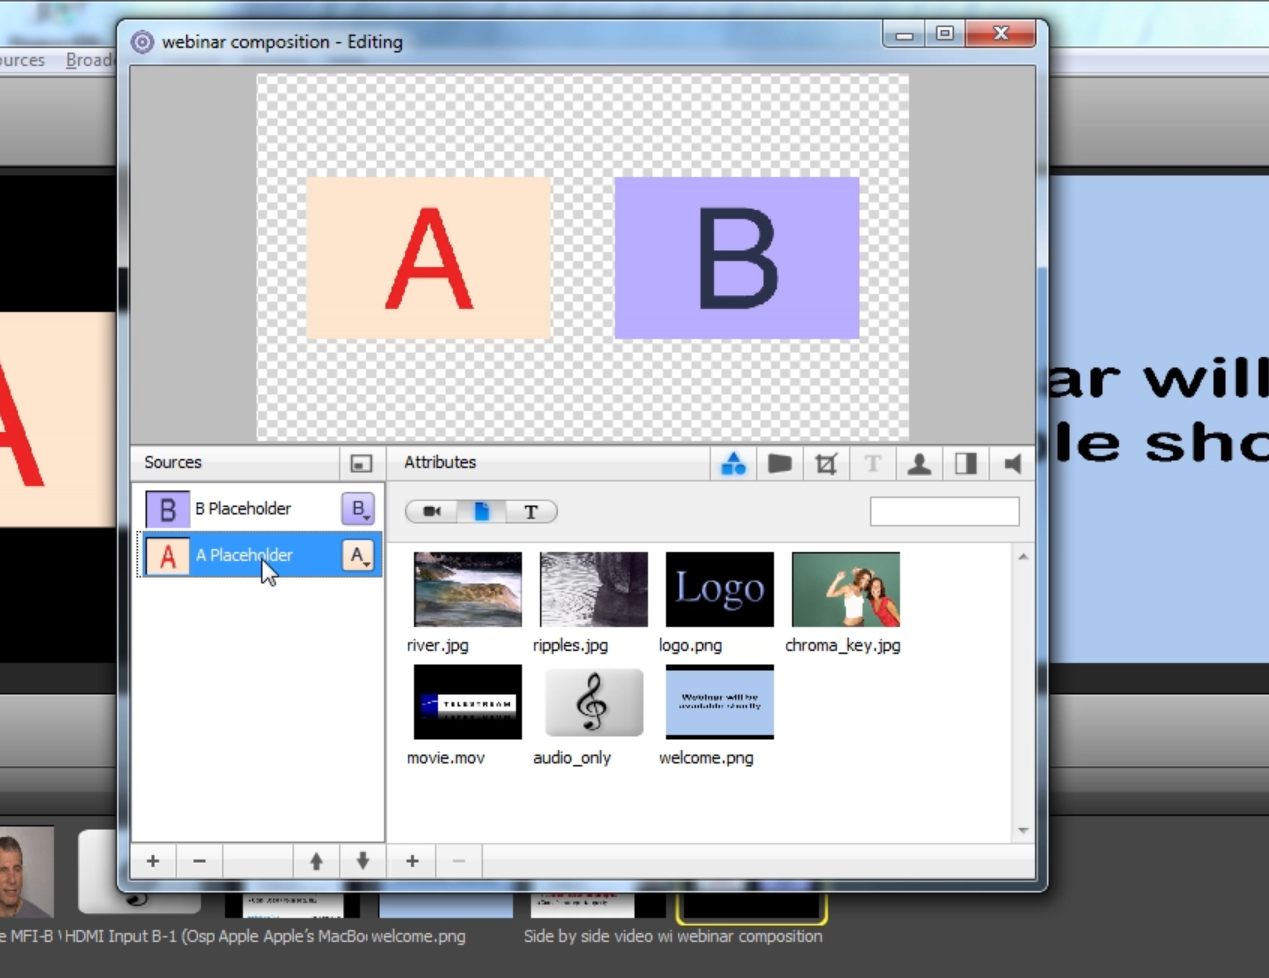
Figure 5 (below) shows the two placeholders in the editor for the two visual components.

Figure 5. Placeholders in the Editor for the two visual components of our presentation.
A is where I want to put the PowerPoint, so I click the A Placeholder in the Sources menu (Figure 5), click over to the video inputs, and choose the Apple MacBook Pro input (Figure 6, below).

Figure 6. Choosing the Apple Mac Book Pro (PowerPoint) input for Source A.
Related Articles
The Mount Royal Curling Club leverages the Telestream Wirecast Pro and Matrox VS4 to deliver a live-switched feed of the 2013 Canadian Mixed Curling Championship to online viewers across Canada.
Running Telestream Wirecast with the Matrox VS4, a powerful, well-integrated capture card, handling most of the input/encoding/previewing load, yields impressive results that catapulte Wirecast into the TriCaster/Livestream Studio class of product when it comes to responsiveness.
This tutorial describes how to install and configure ViewCast's dual-channel Osprey 820e card ($1,795 MSRP; as low as $1,400 street) into a Windows system for driving two cameras within Telestream Wirecast, and discusses the board's highly functional set of utilities and SimulStream feature, which allows it to feed audio and video streams to more than one encoding application.
This is the first of a three-part tutorial on using Wirecast to mix two streams of video and other disk-based content. In this first tutorial, I'll describe how to install and configure two Blackmagic Design Intensity Pro cards into an HP Z600 for switching with Wirecast.