Review: Sling Media SlingStudio
At the 2017 NAB show in Las Vegas, DISH Network-owned Sling Media introduced the SlingStudio, a professional multi-camera streaming/switching appliance. At $999, it competes with a number of existing pro-grade products from the likes of Teradek, LiveU, and Matrox.
With the explosion that mobile live broadcasting has seen in the consumer and professional space within recent years, it’s getting harder for companies to distinguish themselves from everyone else. Live streaming apps abound for seemingly every possible niche. There’s Twitch for gamers, Twitter and Facebook for social connections, and YouTube for everyone else.
Most of these streamers are all using the same general device to stream: a smartphone. While smartphones are very capable for most wannabe streamers, they don’t quite cut the mustard for pros. Until recently, going from a single-smartphone stream to a multi-camera broadcast was a huge leap in cost and complexity. At the 2017 NAB show in Las Vegas, DISH Network-owned Sling Media introduced the SlingStudio, a professional multi-camera streaming/switching appliance. At $999, it competes with a number of existing pro-grade products from the likes of Teradek, LiveU and Matrox.
I was given a chance to review one of the first units available from Sling. The review kit included the following:
• SlingStudio unit (1)
• External hard drive (1)
• SlingStudio CameraLink (2)
• SD card (1)
• SlingStudio USB-C Expander (1)
• 3.5mm audio line-in cable (1)
• SlingStudio battery (1)
• Magnus tripod (2)
• iPhone 6s+ (1)
• iPad Pro (1)
• Manfrotto tripod (1)
• Manfrotto Smartphone Mount (1)
In addition to this, I received two Canon Vixia HF G20 1080p cameras. Shortly after I received the gear, I was given the opportunity to shoot and stream an outdoor concert with performers Kelle Jolly and Will Boyd. With that in mind, I began exploring the gear and building my kit to test everything beforehand.
Main Unit
The SlingStudio unit (Figure 1, below) is about the size of a standard hardcover book, housed in durable white plastic. The optional battery pack enables the unit to run wire-free for a few hours depending on usage.

Figure 1. The SlingStudio unit
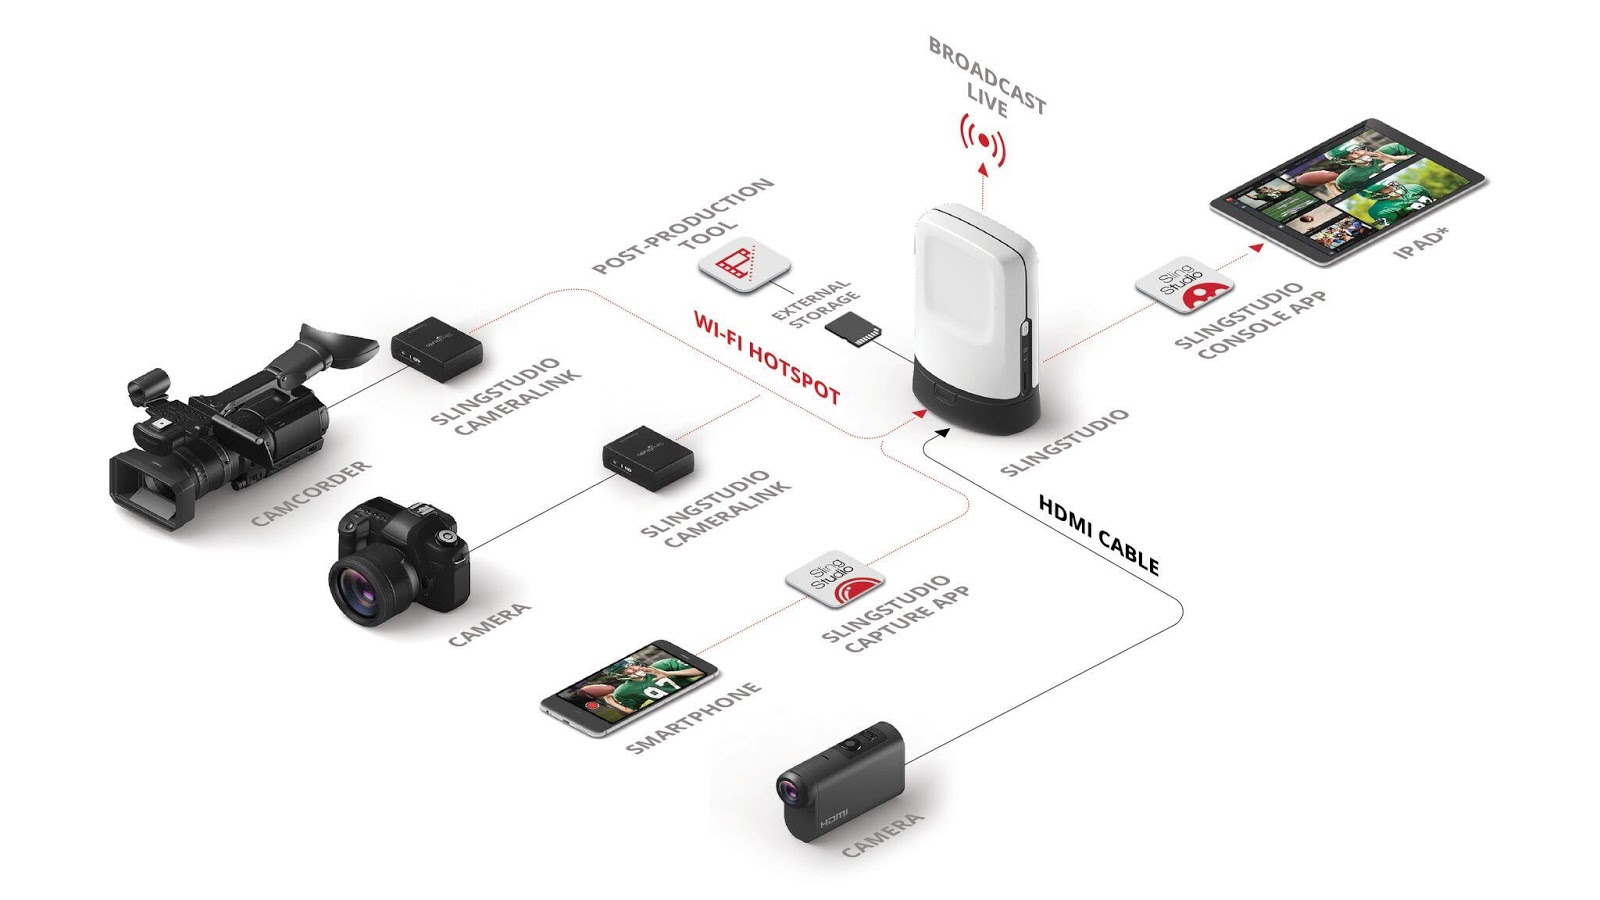
One end of the unit is home to the power button, indicator lights, and SD card slot for recording. The opposite side houses a number of ports: audio line in, USB-C, HDMI out, HDMI in and external power. The unit can use either a connected portable hard drive (by way of the USB-C port) or the SD card slot to record your broadcast. HDMI in allows for a wired camera source while HDMI out allows use of a local monitor of the program feed. Figure 2(below) shows a diagram of a possible SlingStudio setup with compatible devices. (You can see a list of devices certified for use with the product here.)

Figure 2. A SlingStudio live production schematic
Setup
Setting up the unit is incredibly simple and easy. Power on the unit and wait for the large indicator strip along the top to glow solid blue. This means the unit is powered up and has created its own wireless access point. Grab the iPad that you’ll use to control your broadcast and connect it to the SlingStudio wireless network now available. Download and launch the SlingStudio Console app and connect the SlingStudio to your internet-connected wireless network.
This may sound confusing, but essentially you’re connecting the iPad directly to the SlingStudio and then pointing the SlingStudio to an internet connection for live broadcast. You’re now ready to connect camera sources and begin broadcasting.
With the SlingStudio’s HDMI input, you can use any of a number of professional cameras along with multiple smartphones (iOS and some Android phones are supported) to begin a multi-camera production. If you want to go fully wireless, you can purchase CameraLink units which convert HDMI video and audio into a wireless signal that connects up to the Console app. The CameraLink connected cameras can be up to 300 feet away from the SlingStudio.
Related Articles
Two leading multicam webcasting iOS apps compared