Adapting Servo Zoom Lenses for Smooth-Zooming DSLR Production, Part 1
DSLRs have become the standard by which current and future large-sensor camcorders are judged. But as we adopted DSLRs and primes to produce more "filmic" video for our clients, we left something critical behind: the feathery smooth servo zoom that serves feature film producers so well. So how do you get that capability on your DSLR?
Adapting the DSLR
Now I should be upfront about this: The native image area of any of these broadcast lenses is much smaller than the image area of any full-frame, APS-C or Micro 4/3 DSLR. You'll end up with a tiny circle of light in a big frame. Here's how it looks on my Micro 4/3 camera.

This is the "circle of light" of a 2/3" lens on a Micro 4/3 sensor.
But if that were the end of it, I wouldn't be writing this article. There are several ways to make these lenses perfectly usable:
Use the Doubler
Using the built in "doubler," or 2x extender that some lenses have, dramatically widens the circle of light. This can make the image directly usable on APS-C sensors and, if you letterbox the vignetting out, possibly even on full-frame DSLRs. Using the doubler drops the light a stop or two so you'll need to compensate in the camera.
Use a Lens Adapter
Using a lens adapter does the "doubling" on lenses that lack it. While the adapter is significantly more costly, it dramatically widens the market of lenses you can choose from. It also drops the light coming in the same as a lens's built-in doubler.
Crop the Image In-Camera
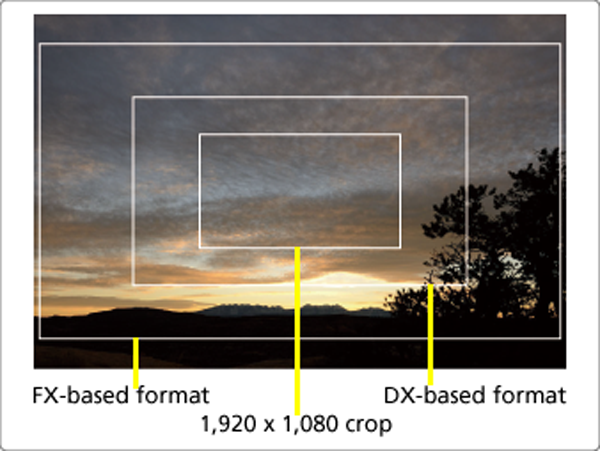
Use a camera that can "crop" the area it uses to record the video. This means that the camera uses a small area in the middle of the sensor as the source for the video recording. Panasonic pioneered this ability with the GH2's Extended Telephoto Crop (ETC). Nikon's latest DSLRs (D4, D800) offer multiple crop areas for video.

It's likely that this will soon become a standard feature of DSLRs designed for video, as it lets you use many more lenses on a given camera body. It also enables one "prime" lens to be used with different crops, giving you multiple "virtual" lenses.
Panasonic's ETC mode was one of the key reasons I selected the Panasonic GH2 as my DSLR. One of the side advantages of the 1920x1080 crop in the center if the sensor is that it completely eliminates any line skipping, pixel binning, moire, and aliasing. You take exactly the pixels you need. Nothing is thrown or averaged away. A slight downside is that, without the pixel binning (combining the data from a group of pixels and using it as one), high ISO noise becomes more visible. The pixel binning helped mask it because noise on any one pixel was averaged out and hidden by the others in that "bin."
So, while I will be using the GH2, you should be able to apply at least one of the above solutions to your DSLR, or other large-sensor camera you use such as the Panasonic AF100 or Sony FS100. I do not make any guarantees that any particular lens works with any particular camera. You need to assess and make your purchases making your own judgment.

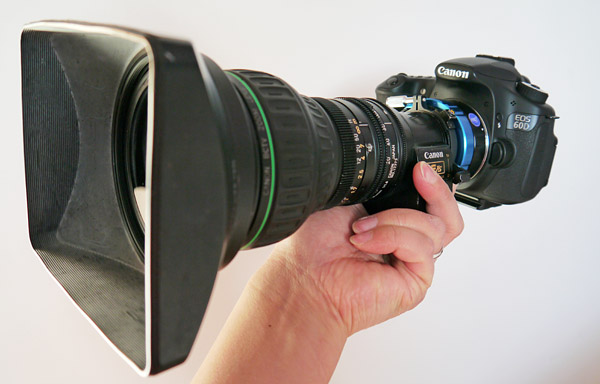
A Canon B4 lens attached to the Canon 60D DSLR via an MTF adapter (image by Dan Chung)
Buying a Lens
When I went to buy my lens, I went to the best place to get a lens for less than what its really worth these days: Ebay. Go to Ebay and you'll find hundreds and hundreds of ENG lenses for sale. This is why the lens model information is so important. Really knowing the specifications is the only way for you to easily find lenses that will work for you, and rule out those that don't.
One thing that you need to consider, though it's difficult to accurately ascertain, is the conversion from the "mm" measurement on the ENG lens, to what it would be in 35mm terms, or for your particular camera. Adding any in-camera sensor crop on top of any "multiplication factor" of the lens just adds to the confusion. For me, my ENG lens using the ETC crop at 9mm translates to about 23mm on my GH2 kit lens, which is about 46mm in 35mm terms. Confused? Well, it takes some getting used to, but eventually you'll get the feel of what lenses get what field of view.
The vast majority of the lower cost lenses are designed for standard definition (SD), 4:3 aspect ratio cameras. This doesn't change the circle of light, but it does change the resolving power of the lens. SD cameras were only tasked with providing 400+ lines of resolution. HD cameras typically provide well over 1000 lines of resolution. But--and this is a big "but"--many SD cameras were designed with optics that far surpassed what the SD cameras could resolve.
When I spoke with Canon as I was researching this article, they highlighted the specific designator for me. Canon's lower-cost YJ (ProVideo) lens was designed to be "good enough" for SD. Their J and PJ lenses were designed to be as good as they could make them at the time. The PJ are studio or "box" lenses that you certainly won't be looking to use with a DSLR. But a J lens will look a lot better on an HD camera than a YJ. So plan your strategy accordingly.
This leads to a possible downside of using ETC mode, as opposed to the 2x in the lens. With ETC, any chromatic aberration (CA) in the lens is exacerbated by pulling the image pixel-for-pixel from the chip. If I used the whole sensor, and the GH2's pixel binning for video, the CA of older lenses would be better hidden by averaging the pixels. But, in terms of the ETC mode pulling an image from the very center of the chip, CA is still minimized compared to the edges of the image area where CA is usually much worse.
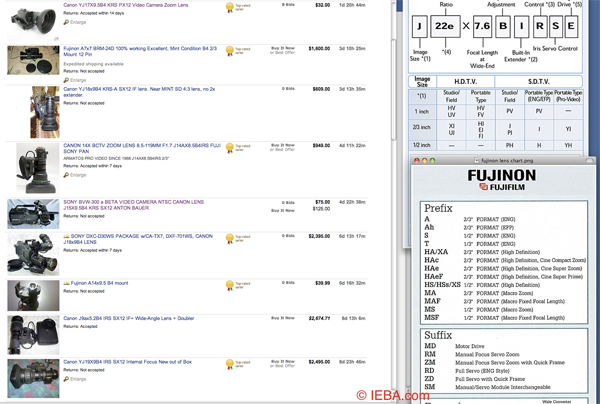
When I was shopping, I had lens chart information on the same screen as the auction listings so I could easily refer to it with each listing to really know what I was looking at.

Keep the charts handy when shopping so you can easily spot the good lenses (it's hard to see the specifics at the size of this image, but you should be able to see plenty of detail on your monitor if you keep these charts open when you shop).
Ironically, I found that some sellers were so interested in getting rid of old SD gear, that entire cameras in travel cases were priced cheaper than just the lens itself. So keep your eye out and be creative when purchasing.
I began by purchasing a very old Tamron lens that was designed to work on the Sony M2 tube camera, just to go through the process to see if this would work at all. While this lens would be no match for even the kit lens that came with my GH2, it enabled me to go through the process, affordably, to see if all the pieces would work together and determine if I could indeed get a smooth servo "push" with a DSLR.
Related Articles
Adapting servo zoom ENG lenses to your DSLR rig with suitable rails and power makes for a smooth transition from prosumer camcorder to large-sensor video camera.