Review: Litepanels MicroPro Hybrid DSLR LED
Litepanels recently shipped the MicroPro Hybrid, a dimmable, on-camera Hybrid LED that can refresh itself much faster than most any strobe light can. Thus it may pack a powerful 1-2 punch for DSLR producers who need to capture both video and still images. But how well does it handle both tasks? In this article Anthony Burokas reviews the new light and compares it to an LED light that's one-fifth the cost to see how these two lights measure up.
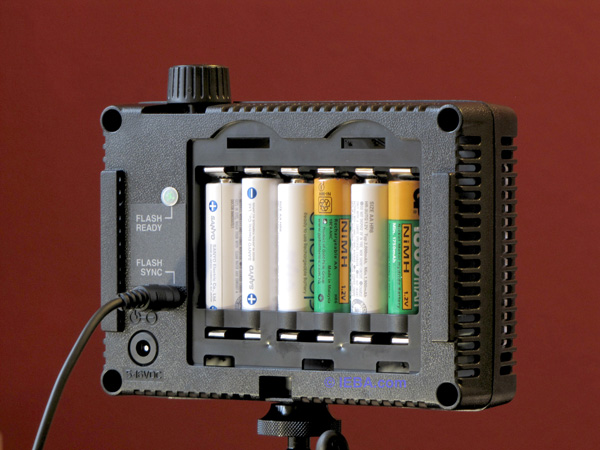
However, storing the filters on the back of the light covers the flash sync port. So I ended up putting them in my pocket. The MicroPro takes 6 AA batteries and I loaded it up with some NiMH batteries (Figure 4, below). These, plus the size of the unit, plus the weight of the ball head adapter, plus the distance from the center of balance in the camera, combined to make this a very top-heavy unit to operate. It weighs 464 grams ready to use. I wish there were a shoe to slide in a small Lithium-ion battery instead of the NiMH. For comparison, my z96, with a Sony Info-lithium NP-F570 battery, weighs 325 grams, which makes it about 30% lighter.

Figure 4. The MicroPro loaded up with 6 NiMH batteries
Usage
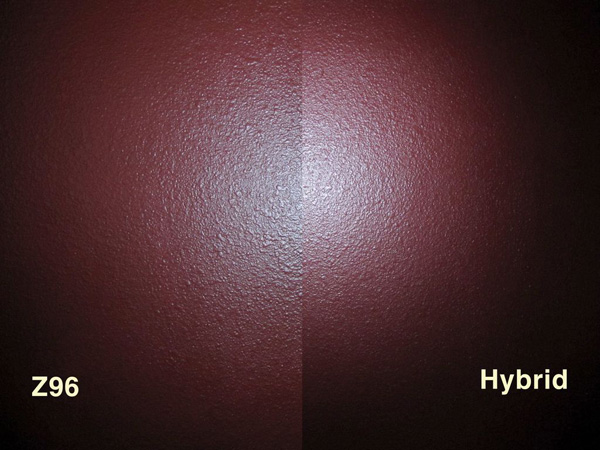
The LED light coming from the Litepanels MicroPro was smooth and there appeared to be a good uniformity to the LEDs themselves. My Z96 has more variability to the LEDs—you can spot at different illumination levels, especially at darker settings. I found the beam spread of the MicroPro to be very narrow. The MicroPro's included white diffuser panel did not affect the beam very much, and the tungsten correction filters are clear, so there's no additional diffusion offered there.
I desperately needed either more diffusion panels, or a way to bend the motherboard into an arc that would widen the point of light into an arc more suitable for widescreen video. You can clearly see the difference in beam spread between the two lights in the split-screen photo in Figure 5 (below).

Figure 5. The light spread of the Litepanels MicroPro (right) is narrower than the Sony Z96 (left)
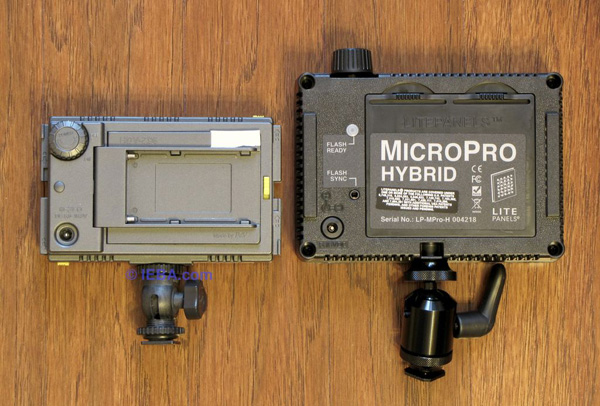
I've grown accustomed to the Z96's dimmer switch on the back corner of the unit (Figure 6, below). The Litepanels switch is top-mounted, which means reaching further, over the top of the already larger and higher light to access the dimmer. When I turn it on, it charges the internal capacitor.

Figure 6. Note the dimmer switch on the back corner of the Z96, which I find much more accessible than the one on top of the MicroPro (right).
If I'm turning it off and on repeatedly as I move between event setups, the Litepanels MicroPro "pops" the charge in the capacitor so the light flashes--at 4x full brightness, every single time I turn it back on.
This is annoying to me, and to whomever is in front of me. It dims up from black, but only after the super bright flash. I already mentioned that I found myself fighting the ball head adapter. It always seemed to be either too lose or too tight. I could never get a "semi-loose" setting that would stay put until I gave it a push to tilt it back for a shot, or tilt it down for a close up. When it was tight, it never moved accidentally, though.
Using a Flash Adapter
I added a Vello HSA-PSU flash adapter for my camera. The Vello adapter fits in between the hot shoe and the ball head and converts the hot shoe flash signal into a PC jack that the MicroPro Hybrid connects to. My camera lacks a built-in jack.
The MicroPro Hybrid worked flawlessly with this adapter setup so it is easily adaptable to most anything with a hot shoe. Using the LED flash is vastly different from using any flash that communicates with the camera with regards to camera settings, distance, and intensity of the desired flash.
Flash Communication
The MicroPro Hybrid, as with any flash connected to the camera's PC jack, has one flash setting-"Poof!" You have to adjust your camera to properly expose depending on the distance to the subject. If you're used to just turning on a flash that adapts itself based on information from the camera, you're in for a rude awakening.
This is old-school flash usage. You set your shutter to a "sync" setting (usually 1/60 or 1/125) and adjust the aperture or the ISO to compensate for the intensity of the flash. Or you set a general exposure level, based on an average distance-say, 10 feet for a group shot--and you wing it. Shoot, check it, move closer or further a step or two to compensate. Or adjust your camera settings. Shoot again. Thank them for the photo.
There's a huge market here for the first company who makes a TTL LED flash that communicates with the camera and sets itself properly. Small, lightweight, and uber-fast recycle times.