Tutorial: Configuring Blackmagic Intensity Pro for a Live-Switched Wirecast Webcast
This is the first of a three-part tutorial on using Wirecast to mix two streams of video and other disk-based content. In this first tutorial, I'll describe how to install and configure two Blackmagic Design Intensity Pro cards into an HP Z600 for switching with Wirecast.
Configuring the Blackmagic Design Utility
The Blackmagic utility is where you identify the physical connectors and the video input standard. Unless these are set properly, your video won't appear in Wirecast. So spend some time up front to get things right.
3. Choose the card you're configuring. When you have multiple cards installed, you use the same utility for all cards, and toggle among them using the drop-down list on the top right (Figure 5, below).

Figure 5. Choosing which Intensity Pro card you're configuring.
You can see the Video and Audio Levels tab in Figure 5 (above). Video adjustments are limited to calibrating video and chroma levels, in and out, with the option to adjust Cb and Cr independently. There are no controls for adjustments like saturation, contrast, or individual colors. For audio, you can set incoming and outgoing reference levels for analog and AES/EBU channels.
4. Choose your outputs. Let's work top down. First you set the output, which tells the card where to channel the output signal, which is critical if you're connecting a display monitor, projection system, or the like (Figure 6, below). You have two choices; HDMI & Component, and HDMI & Composite (Y Out) & S-Video. Choose the setting that matches your output connections, or just leave it alone if you don't have an output device connected.

Figure 6. Choosing your output connections.
5. Choose your cable inputs. Then you set your input connection, which obviously has to match the outputs from your cameras. I used Component Video & Analog RCA Audio, so I selected this setting (Figure 7, below).

Figure 7. Choosing your input connections.
6. Choose video setup options. If you're capturing SD-NTSC video, you have to choose either the 7.5 IRE option for working in the USA, or 0.0 IRE for Japan (Figure 8, below). Again, if you're working with HD video, you don't have to worry about this option.

Figure 8. Choosing your input standard.
7. Configure the "Remove field jitter when video is paused" checkbox. Though the "Remove field jitter" checkbox was enabled by default, the manual says, "When interlaced video is paused on old CRT monitors, eliminate field flicker by only displaying a single field. We do not recommend using this option with modern flat screens." I didn't notice any difference with the checkbox enabled or disabled, but I disable it.
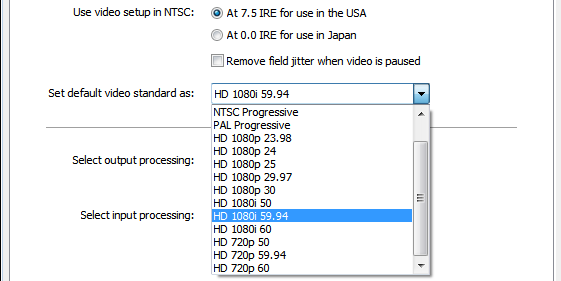
8. Choose the default video standard. In this drop-down list box, check the setting that matches the standard used in your source video, typically a camera, or output from a video mixer. Though I had my XH A1s set to 30F mode, the Blackmagic cards wouldn't recognize the cameras when I used the HD 1080p 30 setting. I tried a number of configurations, including HD 1080p 29.97, which didn't work. Cycling through the relevent options, I tried HD 1080i 59.94 which worked.
Frustratringly, the only way to see what's "working" is by having an application open and seeing if the video appears in the playback window. You can use Blackmagic Media Express, a capture/playback utility that Blackmagic includes with each capture card that it sells, or you can use Wirecast, which is the program that I'll demonstrate.
Related Articles
Any time you produce a webinar that's got PowerPoint and a talking-head video, it's helpful to present them in the same video frame. This tutorial explains how to composite these two sources in Telestream Wirecast.
Streaming Media Producer kicks off its "What Is...?" series tackling essential topics in the streaming media production world with a look at live switching, touching on the differences between switching and mixing, assembling the components and crew of a live switch, and the basics of "punching" a multi-camera show or event for live delivery.
This tutorial describes how to install and configure ViewCast's dual-channel Osprey 820e card ($1,795 MSRP; as low as $1,400 street) into a Windows system for driving two cameras within Telestream Wirecast, and discusses the board's highly functional set of utilities and SimulStream feature, which allows it to feed audio and video streams to more than one encoding application.