What's New in Sony Vegas Pro 12?
Vegas Pro 12, the new version of Sony's flagship NLE that debuted a few weeks ago, boasts several new features for online video production pros including simplified color matching, advanced mask creation and manipulation, and increased 64-bit support, while shipping as part of a new suite that includes Sound Forge Pro 10 and the HitFilm 2 Ultimate effects package.
Matching Project Properties, Part Deux
Some projects we shoot in 24p. Some we shoot in 30p, and some we shoot at 720/60p. As in any NLE, when editing in Vegas, you should always set your project properties to match the properties of the footage you are editing.
Recently introduced in the the last couple of years is a feature whereby we've been able to quickly do this in Vegas by clicking the Match Media button on the File | Project Properties screen. You click this button and navigate to a piece of media which you want your project to conform to, as shown in Figure 7 (below).

Figure 7. Conforming project properties to media properties
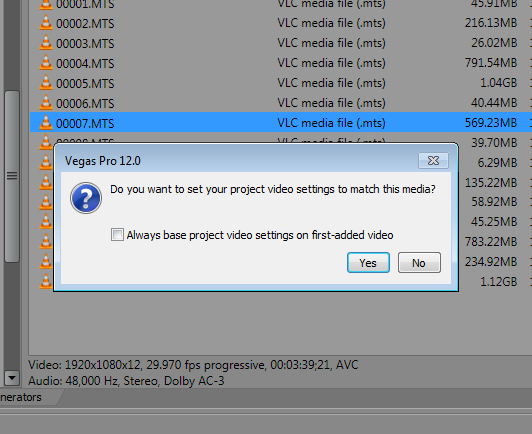
Now with Vegas 12, when you add your first piece of media to the timeline, Vegas will ask you if you want to set the properties to match this media (Figure 8, below). Selecting this feature will work and save you time as long as you remember to make your first piece of media representative of the entire project.

Figure 8. Basing project settings on the first imported piece of media
I also check the box to base project settings on first-added video and Vegas does it automatically from then on.
Expanded Edit Mode
The normal method of cutting or applying other transitions in Vegas is to drop two pieces of media on a track, and click-drag the later piece into the end of the earlier first piece. For years that was enough to make people sit up and take notice of Vegas' intuitive nature. You didn't need two visible tracks to apply transitions; you just "transitioned" from one clip into the next.
Many other pro NLEs (FCP prior to X and Avid, for instance) require that you use two tracks to accomplish this. Vegas can now take you in and out of two-track land quickly when and if you need it.
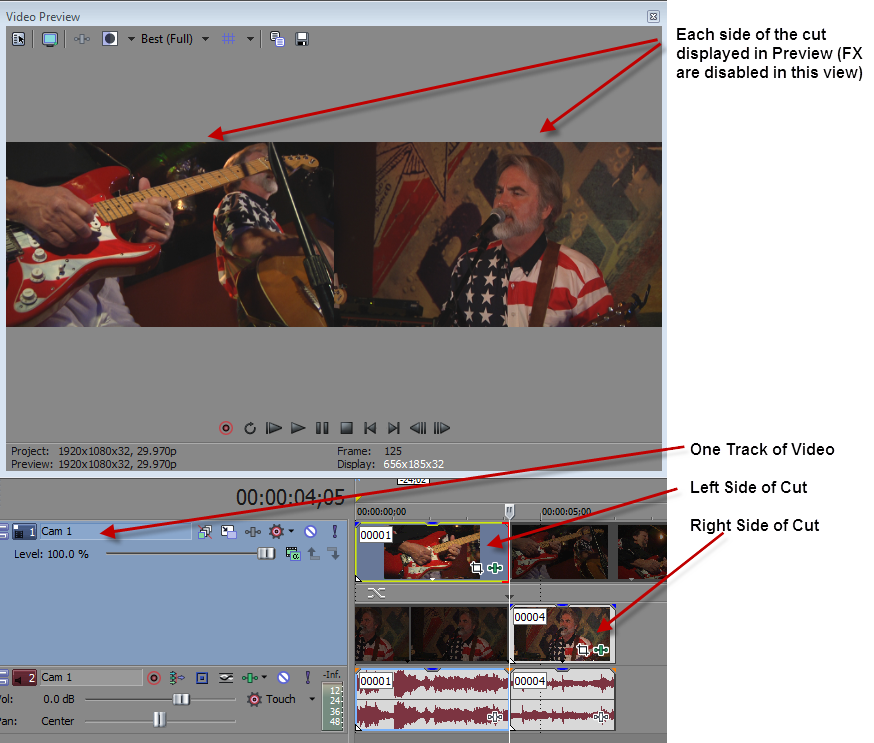
If you're like many long-time Vegas users and haven't edited this way before, you'll find it beneficial in that when you need to, you can really fine-tune the in and out points of the transition or cut in real time. To try out this workflow, click 5 on your numeric keypad to enter and exit Expanded Edit mode (Figure 9, below).

Figure 9. Expanded Edit mode in Sony Vegas Pro 12
Video Proxy Files
It seems like only a few years ago we were shooting and editing Standard Definition material, with a resolution of 720x480 and modest bitrates. Then came the HDV format followed quickly by a dizzying array of Full HD resolution formats using ever-increasingly compressed codecs. Today, RED cameras and other models are capable of shooting at 4K resolutions and the bitrate of the latest DSLR models (hacked or otherwise) can bring even the sturdiest of PC hardware to its knees.
This is where intermediate file formats, or Proxy Files come in. Proxy Files are substitute files that you use to edit with because they have much lower compression applied than the camera originals. Then, once your edits are done, the proxies are swapped for their full-resolution counterparts for the final render.
As a quick example, let's say your PC can play back two tracks of camera original HD files without choking. Using proxies, your PC could get six or more tracks to play back at once, an obvious choice for multicam work.
Proxy Files can be absolutely vital to your editing experience if you have underpowered hardware, but they're not new in Vegas. The popular plugins GearShift and UltimateS Pro from VASST and UpShift from NewBlueFX/VASST provided proxy goodness years ago. It's only now that Vegas includes the ability to create and use proxy files directly from the Project Media window.
From your open project, navigate to your Project Media window. Find a piece of media used in your project, right-click it, and choose Create Video Proxy. You can also Shift-click or Ctrl-click to choose multiple files to act upon. A message box pops up informing you that a Video Proxy file is being created, and that you can cancel if you choose. That's it, no other choices to make.
What it's doing behind the scenes is rendering the media you selected to another format, something that will be much easier on resources such that your editing experience will be better. This render-to-proxy is indeed a render, so it doesn't happen instantly. If working with proxy files is part of your workflow you may want to start your proxy renders just before lunch or when you have something else to do.
Once the files have been created, Vegas will choose when to use or not use them based on the settings you've chosen. If you set your Preview Window to Draft or Preview, then Vegas will use the proxy file. If you set the Preview Window to Good or Best, the original file is used. Having this feature built in to Vegas tightly couples the proxy to the original and eliminates the need to shift them out one for the other. This is a nice benefit if proxies are part of your workflow.
Related Articles
A quick look at the latest new features in Sony Vegas Pro 13, including the Vegas Pro Connect iPad app, a proxy-first workflow for mobile and 4K editors, and true, four-range loudness meters.
David McKnight demonstrates a quick, easy way to generate sharp-looking titles for your Vegas Pro projects that requires no additional plugins.
A new year, a new and inviting collection of video utilities from NewBlueFX, one of the leading players in the video plug-in game. In this article, we'll look at their sixth volume of plug-ins billed as "essential." Are they? Read on to find out.
Both come equipped with versions of the visual effects software HitFilm 2, which enables users to add visual intensity to movies with advanced 3D compositing, extensive 'film-look' filters, and over 100 visual effects
Workflow improvements in Vegas Pro 12 include Project Interchange with Premiere Pro, Pro Tools, and FCP 7; Expanded Edit mode, for fine-tuning the timing of a project using an interactive "A-B roll" paradigm; Color Match, for quickly matching the color characteristics of different video clips; and Smart Proxy editing
Sony SpectraLayers is a dynamic new audio editing tool for Mac and Windows users that might be best described as "Photoshop for Audio," featuring the ability to isolate and edit individual layers of a mixed track using frequency analysis. In this video review, David McKnight explains how it works and what it offers post-production pros with complex audio issues to resolve.
The new mixer layout in Sony Vegas Pro 11 makes editing audio for video in Vegas feel like you're using a pro hardware mixer. Vegas instructor David McKnight explains how it's done.
Sony Vegas instructor David McKnight continues his video tutorial series with a look at Vegas' new GPU Assist feature, which enables Vegas editors to leverage the processing power of supported NVIDIA and AMD video cards to get full-frame previews of loaded timelines and accelerate rendering with many popular codecs.
Sync Linking is a cool new feature in Sony Vegas Pro 11 that allows you to group clips of events and move and control them in the timeline with a single Master clip, while still being able to fine-tune subordinate clips within the group.
In this tutorial you'll learn how to make the most of Vegas's new by-parameter keyframing capabilities for effects plug-ins that ship with Vegas Pro 11 using the new Sony Text & Titles plug-in as an example.
In this fifth tutorial in our six-part series on Sony Vegas Pro 11, we're going to talk about the Render dialog box. Every project you work on, whether it's delivered on the web, or even on DVD or Blu-ray Disc, has to go through a rendering stage, so you'll find yourself getting quite familiar with it as you do more project. In Vegas Pro 11, Sony has added some new features to the Render dialog, and they've totally revamped the way that it works.