Apple Final Cut Pro X Reviewed: Not Ready for Professionals
 It takes years to get to know a video editor like Final Cut Pro X, and if you're experienced with one or more video editors, you're inexorably biased against new programs that do most of the same things differently. So in this article, I'm going to introduce you to Final Cut Pro X (FCPX), and give you a first impression. I'm not going to cover all the new features, or attempt to completely explain the new workflow.
Instead, I'll work through a test project that I've used since about 2005 that tests a range of features like trimming, color correction, speed changes, chroma key, brightness and contrast correction and many others. I'll create the project and report on what I encounter along the way. I'll supplement this with some experiences gained from editing an AVCHD-based clip with FCPX in parallel.
Let's Clear the Air
FCPX comes with some heavy expectations, and it's clear that there's a major mismatch between what many professional editors were wanting and what Apple delivered. Is FCPX a pro-class editor? That depends on the types of projects you produce -- remember that Hollywood movies used to be made with the equivalent of scotch tape and razor blades. For me, the lack of multi-cam support makes it a complete non-starter for displacing Final Cut Pro 7 or Premiere Pro for the majority of my projects. For many other editors there are similar issues that disqualify FCPX.
But, as many bloggers and message board participants have pointed out, there are 50 million iMovie users, and only about 2 million users of Final Cut Pro 7. Final Cut Pro X loads iMovie projects, but not Final Cut Pro 7 projects, which either reflects the code-base FCPX was developed from, the most important target customers for the new program, or both. It's pretty clear which group represents the most potential revenue.
But for the purposes of this article, I'm going to ignore all that. For about ten years or so, I reviewed all consumer class editors for PC Magazine -- that's why I developed my test project. I'm going to analyze FCPX in that context, with a view towards producers of online video -- almost as if Apple introduced FCPX as a high end option for iMovie users, not a replacement for Final Cut Pro 7.
Just to tell you where I'm coming from, before I started this process, I tattooed "be descriptive, not judgmental" in reverse on my forehead, so I could see it every time I looked in the mirror. Thank goodness the wife and kiddies are at grandma's for the week. Though some judgment crept in, I tried to be as objective as possible.
Overall, I found FCPX likeable and competent, but inflexible and idiosyncratic. It's certainly much more approachable than Final Cut Pro 7 ever dreamed of being, which is good for iMovie users looking for advanced functionality and bad for those pros who feel like a cryptic, hard to use program protects their income stream (to which I don't agree). There's a very heavy dose of "how Apple thinks it should be done" that dictates and constrains many operations. If you're an experienced editor with your own thoughts on how things should be done, you won't like that. If you're just starting out, you may agree with Apple.
That rant over, let me conclude this introduction by saying that I didn't tackle Final Cut Pro alone--after spending a few moments looking at the interface, I begged a copy of Larry Jordan's Final Cut Pro X Workflow and Editing training, which proved invaluable in getting me up and running. Final Cut Pro is unlike any editor that you've used before, and it makes sense to sit on the shoulder of someone who's spent weeks working with the program.
Note that the training is very heavy (like 11 hours) on high level workflow, editing, preferences, and the like, but very light on effects, an area where Larry intends to release another training program soon. If you're serious about editing with FCPX, you should strongly consider buying the training.
Getting Started
As much as I think the App Store is an Anti-trust lawsuit waiting to happen (imagine if Microsoft or IBM did it back in the day), you have to like the experience -- you click Buy, wait for a few moments, and the program is downloaded and installed. Pretty sweet.
Once I was up and running, I listened to Larry explain that there are two key project-related concepts; events and projects. Events are collections of content, while projects are where you deploy the content to create your movies. Events and projects have their own libraries, and you can create multiple projects from the same events or use content from a single event in multiple projects.
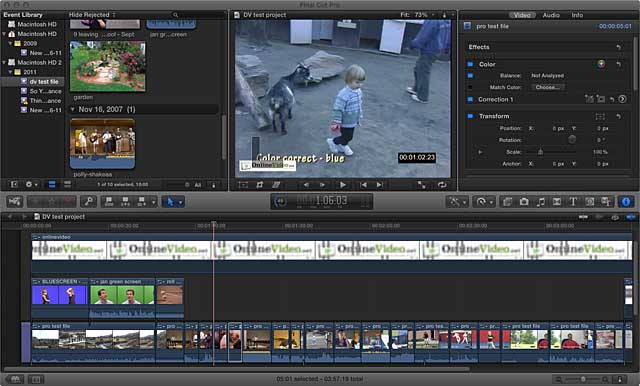
In Figure 1, the Event Library is on the upper left, while the DV test project is open in the Timeline on the bottom. If I clicked the little film roll on the bottom left, I would see all of my projects in the Project Library. Double-click any project in the library and it opens in the timeline.
You start importing content by creating a new event, which you can do on any drive in your system. Then you import your content from your camcorder, using the useful camera import dialog shown in Figure 2. The circled clip is the one previewed in the monitor atop the interface. The little yellow bracket thingies represent the in and out points of the clip that I'm importing, so you can do some trimming before you actually import.
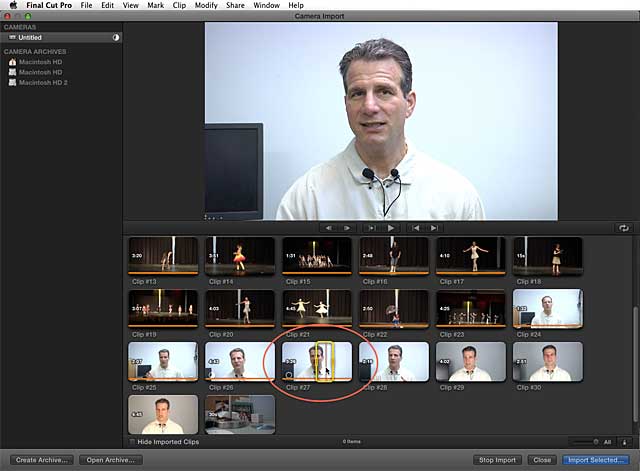
I didn't import from tape on any project, which is possible in the new program, but only by streaming in real time. Unlike Final Cut Pro 7, There's no batch capture function that lets you enter in and out points and capture only the specified sequences.
Once you choose the clips that you want to import, you click Import Selected and you'll see the dialog shown in Figure 3. FCPX can edit most formats natively, though it will rewrap them into the QuickTime format. At least in the AVCHD clips that it imported for my project, FCPX also converted the AC-3 encoded video to PCM for editing, which makes sense.
As you can see in Figure 3, you can also transcode your clips into "optimized media" during import, which converts them to ProRes 422. You can also analyze for audio and video problems which I didn't do because I wanted to address those issues manually.
Once you Import the clips and return to FCPX you can start to edit right away, even while FCPX is transcoding your clips. I will say that importing in this fashion crashed the program several times during startup. It's kind of a "no harm, no foul" situation, however, since all edits are saved instantly. You just click Reopen when the crash window opens, and you're back where you were before the crash. Once I got the files imported, however, stability improved immensely.
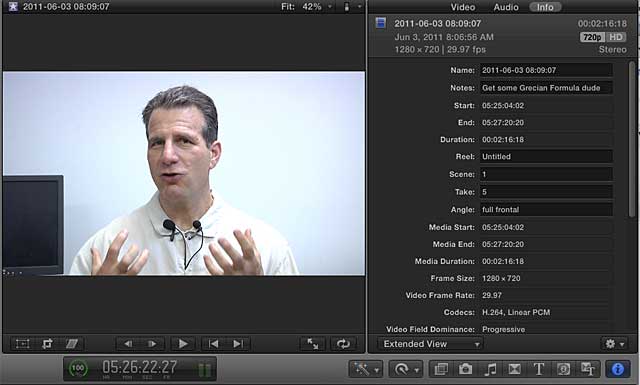
What didn't improve was file organization, at least according to how I think it should be. Specifically, you can't organize your event bins with folders, which is possible (more like essential) in Final Cut Pro and most other editors. With FCPX, Apple has caught the metadata bug, which no doubt has some folks at Adobe, who have been banging the metadata drum for years, grinning in their beers or latte or whatever they drink down there in San Jose (Figure 4). However, though you can sort your event bins by date, reel, scene and other metadata elements, you can't create bins to group your content. If you're borderline OCD about keeping your bins clutter free (like I am), this will drive you nuts, and it's a primary example of the inflexibility that I mentioned above.
Editing Paradigm
As you can see in Figure 1, FCPX no longer has a Source window, which is where you used to review your clips and choose in and out points. In FCPX, you use a procure called skimming to preview your clips. Basically, if you hover your mouse over the clip in the event bin, you preview the audio and video in the preview window on the right. In Figure 4, I'm hovering the mouse over the highlighted clip on the left to preview. Click the clip and it loads into the preview window itself, where you can use the player controls directly. Skimming does get irritating during the late stages of your project, and you can easily disable/enable audio and video skimming via icons on the timeline.
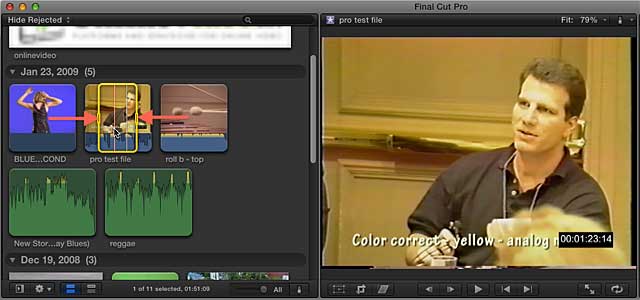
As you can see in Figure 5 you can use the yellow control box around the clip to select in and out points. Precision is an issue if you use only the yellow control box, but if you select the clip, you can use the arrow keys on your keyboard to move to a specific frame in the preview monitor. Click I for In, O for out and you've got your clip ready to send to the timeline.
In the timeline, FCPX debuts a several new paradigms, including the primary storyline, connected clips, and the magnetic timeline. Each project has a primary storyline, which is the A-roll of footage. When you add clips above and below the primary storyline, you can "connect" them to the clips on the primary storyline at that location using various program controls. In Figure 6, the circles indicate the connections you'll see between clips on the primary storyline and those above or below it.
The concept of magnetic timeline means that when you drag a clip from the primary storyline, connected clips come with it. Obviously, this is desirable, though this all seems like a lot of work to fix a loss of synch problem that really didn't pop up all that often and was immediately obvious when it did.
Blocking and Tackling
By blocking and tackling, I mean all the stuff you do when you create your projects, from trimming to color correction to adding transitions to adjusting your audio volume. Boring stuff, but stuff you do every project. In most of these roles, but not all, Final Cut Pro was top notch.
Trimming is trimming, FCPX does it and it works just fine with no real learning curve. There is a drop down toolbar with most of the same tools found on the Tools Palette, including cursors for selecting, trimming, cutting, zooming and moving, all with keyboard shortcuts. Once you start with effects, though, you'll have to learn some new tricks.
As with Final Cut Pro 7, there are two classes of effects: built-in effects, which are essentially applied to every clip, and clip effects, which you have to apply manually to your clips. Built in effects now include color correction, transform, cropping, distortion, stabilization, rolling shutter, spatial conform, and compositing. I worked with most of these in my test project. To view the built-in effects, click the clip in the project and then the Inspector button on the bottom right (Figure 7).
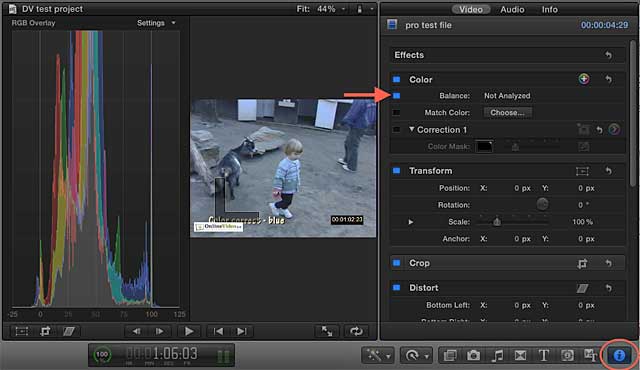
Let's start with color correction, which is a skill that every editor needs to learn. Here you have several options. First, if you click the Balance button shown in Figure 7, Final Cut Pro will attempt to color balance the clip. Or, you can use the more extensive color adjustments shown in Figure 8 (called the Color Board), which are accessed by enabling Correction 1 in the Color effect, and clicking the multicolored circle with the right arrow.
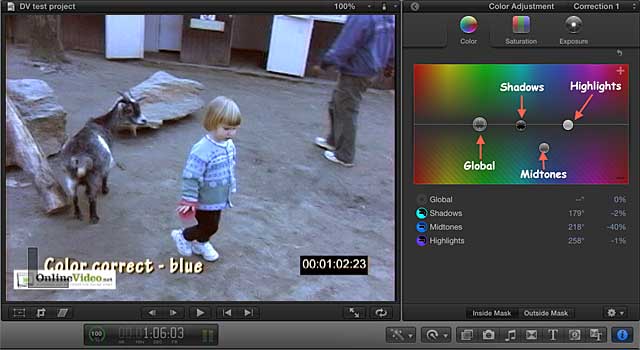
There's a wonderful YouTube video by Garret Gibbons (http://www.youtube.com/watch?v=qtu3APJs9tc) that explains how this works, and you should definitely check it out for a comprehensive, contextual, and clever look at the Color Board. The CliffsNotes version is that there are three adjustment classes available atop the interface, for color, saturation, and exposure. In each class, you can adjust values globally, or just for the shadows (darkest 1/3 of pixels), highlights (lightest 1/3 of pixels) and midtones (the rest). While it looks simple, this is the same operating schema as most three-way color correctors and even Photoshop Premiere/Pro's fabulous Shadow/Highlight filter.
In the figure, most of the blue tint was contained in the midtone channel, so I dragged that down to reduce the blue values. I also boosted the contrast and saturation a bit in the other tabs, and got a great result. I'm gushing, but I wish Apple had also left in the "pick an area that's supposed to be white and we'll do the rest" eyedropper that worked so well in Final Cut Pro 7. It would also be nice if there was an obvious way to toggle the filter on and offer from this view, and/or a split screen view that showed before and after.
This grumbling aside, this built-in effect worked well with all three color correction sequences in my test clip, as well as the two sequences that test backlight correction. For these, you toggle over to the exposure tab and boost brightness in the Shadows, which is how Adobe's magical Shadows/Highlights effect works. You can save any of these adjustments so you can easily apply them to other clips with the same problem.
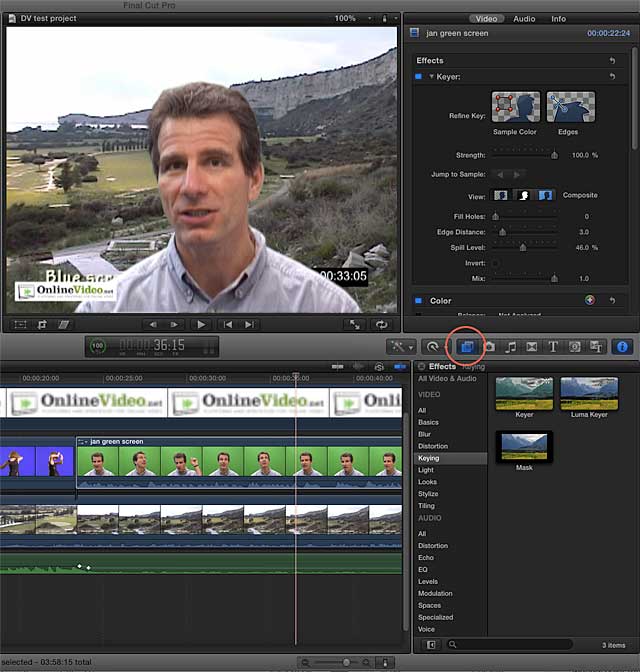
Moving along, the Keyer did a very solid job on both green and blue screen clips. The Keyer is a clip effect, which you find in the Effects browser, the circled icon in the middle right. To apply, you drag it onto the clip, and configuration options appear on the upper right in the Inspector. No adjustments were required, the effect was perfect on both my green screen and blue screen test clip as applied.
Changing Speed
Speed changes are another commonly used effect. With FCPX, you can easily change the global speed of a clip by dialing in a specific speed percentage (like 200% or 50%) or you adjust the speed variably, say from 100% to 50% using the retiming controls shown in Figure 10.

Essentially, the retiming control divides the clip into four parts, and you can set the speed for each region with FCPX ramping smoothly between the regions. I found it somewhat clunky to use, but came close to achieving the effect that I wanted.
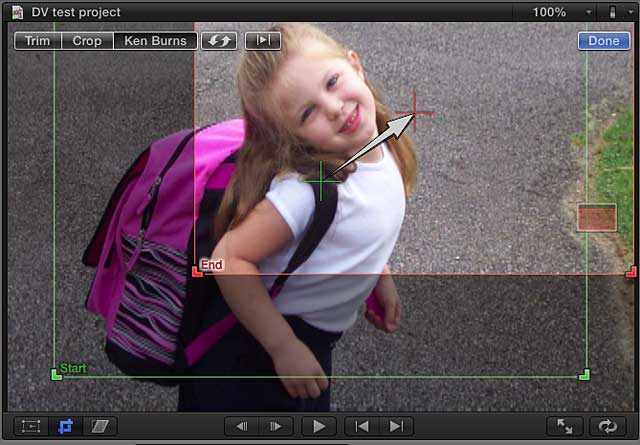
FCPX offers a dedicated two-position Ken Burns effect for animating still images, which I show in Figure 11. You use the green box to set the starting position, the red box to set the ending position, and Final Cut Pro animates between the start and end positions. Or, you can ignore the Ken Burns effect and use the Transform controls and keyframes to create a multiple position effect.
That said, working with key frames is much less intuitive in the new program; you do all the work on the timeline where keyframes are hard to see and controls disjointed. It's probably not a big deal if you know what you're doing, but most novices will have a hard time finding the key frame controls, much less using them.
Figure 12 shows the animation controls available for each clip on the timeline that you open via the tiny arrows on the upper left of the clip in the timeline. There's a control for each built in effect, and each animatable clip effect that you add to a clip. To set a keyframe, you drag the playhead to the desired frame, choose the effect to animate and click Option-K. Then you adjust the effect as desired in the Inspector, and move on to the next key frame. Keyframes are microscopic and nowhere near the controls used to adjust them, which complicates the entire process.
Image stabilization is a strength; the filter works well with no adjustments and seems to work faster than it does in Final Cut Pro 7. Transitions are transitions; you can apply one transition globally, which is nice.
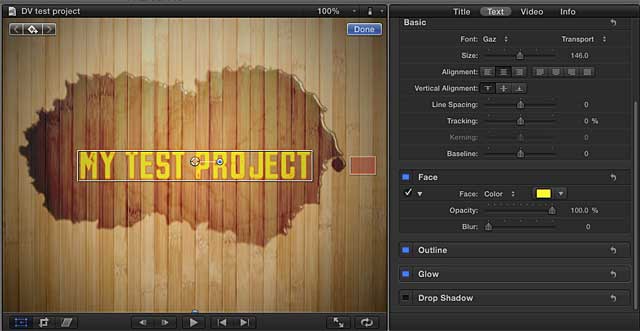
However, the title function still relies too much on Motion for my liking. That said, FCPX includes a good range of presets with very comprehensive font adjustments (Figure 13), and the ability to add generators that work as backgrounds for your titles. While the title function isn't as integrated as I'd like, it's an improvement over Final Cut Pro 7.
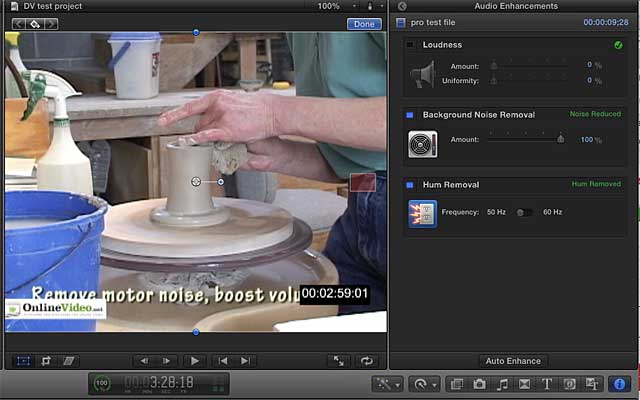
The audio requirements of my projects are generally pretty modest, and FCPX was up to the task -- although it certainly wasn't exceptional. It doesn't offer a real-time mixer and can't automatically duck for dialog (reduce background music volume when a person is speaking), though you can get it done with rubber band controls. Apple did port over the background noise removal and hum removal features from SoundTrack Pro, which worked well on my test clips, though they appear to lack the fine tuning available in SoundTrack Pro.
Sharing options are extensive, as you can see in Figure 15, but somewhat limited. I'm not sure what Apple's strategy is regarding DVDs, since the integrated DVD menu options are modest, and that's being kind. Most home producers will use iDVD, most serious producers Adobe Encore, which is also the best option for Blu-ray.
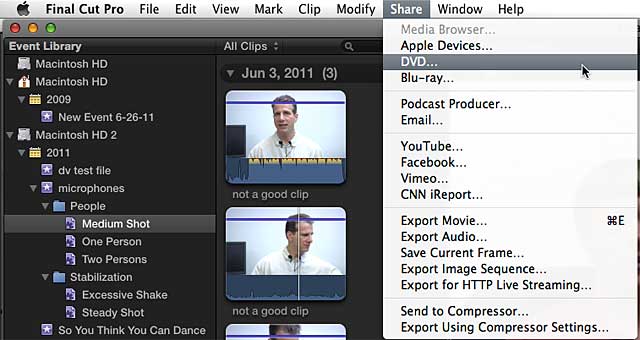
The podcast producer option lets you produce and upload a file to a specified Web server, while the next five options are self explanatory. If you select Export Movie, you can create a QuickTime file exporting to current or a small group of other settings. I did not find a way to create a QuickTime Reference movie, though it's probably available somewhere.
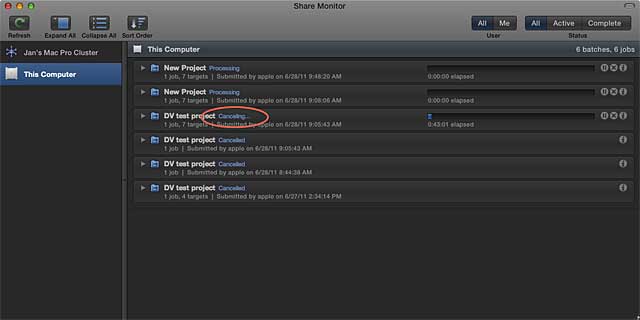
Exporting audio lets you export in MP3, AC-3, WAV, and other formats, while frame and image sequence let you export in JPEG, PNG, TIFF, and other still image formats. FCPX comes with a new Share Monitor (Figure 16) that looks like Compressor's Batch Monitor. Distressingly (at least on my computers), it feels like you need a court order to cancel or delete an encoding run; after clicking the x, it can take forever to actually stop the encode and move onto the next project. At least for me, this is a carryover from previous versions of Final Cut Pro, a problem I sure wish Apple had resolved.
Exporting for HTTP Live Streaming creates files you can use for adaptive streaming. Unfortunately, I couldn't test this function and meet my deadline because of the aforementioned failure to cancel encoding issue. For most, but not all settings, you can send the render to Compressor, which will free FCPX for additional editing, but some encoding options, like exporting a movie, must be performed in FCPX and appear to lock the program up for the duration.
And that's it. While not fully rendered, my project is done, and this review almost, as well. To be honest, though I haven't explored all the performance-related options, and admittedly don't fully comprehend all new features: even if FCPX did offer multi-cam, there wasn't enough to make me switch to FCPX from my current solutions. Recognize, of course, that as an experienced user of Final Cut Pro 7 and Premiere Pro, FCPX would have to be better by an order of magnitude to make me abandon my current solutions (for more on that, see here: http://www.eventdv.net/Articles/Column/The-Moving-Picture/The-Moving-Picture-Who-Loves-Vegas2c-Stays-With-Vegas-49674.htm). And frankly, for most basic editing, it's not even incrementally better, it's just different, at least for experienced users who have already mastered other solutions.
There's nothing here that will convince Adobe users to take a serious look, and given the lack of equivalent high-end functionality, most professional FCP 7 users will have to be dragged over kicking and screaming (which many have been). Of course, if you're outgrowing iMovie or just starting out in editing, your analysis is quite different -- it's tabula rasa, baby. I would suggest, however, that in this consumer/prosumer space, the most relevant competition is Adobe Premiere Elements for the Mac, which costs $99 and can probably do 99 percent of what Final Cut Pro X in editing, and much more in other areas like DVD and Blu-ray authoring, and multiple format streaming support.
Let's take the Apple fanboys (on one side) and jolted FCP 7 pros (on the other) out of the picture for a moment. If this product was released by some unknown Silicon Valley startup, and judged solely on its merits, it would be an innovative release that competes well with most consumer programs, but has some critical feature gaps for even prosumer use. Released as iMovie Pro, as perhaps it should have been, the program would be a fantastic upgrade, if a bit overpriced.
As a replacement for Final Cut Pro 7 or Premiere Pro in its 1.0 state? Fuhgetaboutit.
Jan Ozer's article first appeared on OnlineVideo.net