MediaPlatform WebCaster Review: A Strong Option for Webcasts
 The Software Side of Things
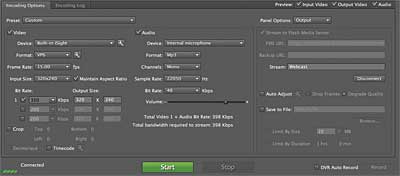
By default, the WebCaster application uses the webcam interface from the Flash player to encode the audio and video. I was told by MediaPlatform reps that I could get higher- quality results by using the free Adobe Flash Media Live Encoder (FMLE), so I did. To tie WebCaster and FMLE together, I clicked the Settings button on the left side of the WebCaster interface (see Figure 9). That opened a window containing the Flash Media Server URL to plug into FMLE, which I entered in the FMS URL shown on the right (Figure 10). Note that the stream name is Webcast, which I’ll refer to again later.
Figure 9 shows the MediaPlatform command center. It has separate widgets for each type of content or interaction, such as the PowerPoint slides or Viewer Questions. Starting to the left of the Video 1 window, note the Settings button that I referred to previously, which contains the Flash Media Server credentials. There’s the Test Event button that lets you take a practice run, which is published to a private URL that no one else can view. When you’re ready to go live, click Start Event, and it then toggles into the Stop Event button.
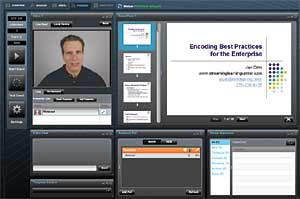 Figure 10 shows the encoding parameters that I used for the webcast, as recommended by MediaPlatform. I would have preferred to use the H.264 codec and produce at 30 fps, but since it was the first time out, I went with MediaPlatform’s recommendations. Note that audio was a frugal 48Kbps mono, which is really all that you need for a talking-head webcast.
We started our event about 10 minutes before the scheduled start time. To fill the dead air before the event actually started, we played a video available in the On-Demand tab beneath the video window. You can upload these into the system before the event and then open the tab and click the video to start playback as needed.
When you’re ready to go live with the speaker, you click back to the Live tab and see all of the speakers who have signed into the webcast, identified by their stream names. In this case, it was just me using the name Webcast, which is what I plugged into FMLE on the right in Figure 10. Click the little head icon, and you’re live.
Operation of the other widgets is straightforward in all cases: For example, to change slides, you choose Next in the PowerPoint window. To show a poll, you click the poll in the Audience widget and click Show.
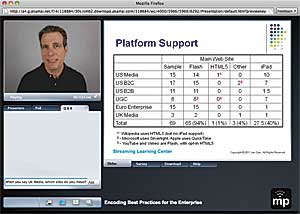 Attendees watch the presentation in the window shown in Figure 11, and tabs that allow attendees to access the different kinds of content are included. Most of the tabs are straightforward, though a couple could use some explanation. For example, the difference between a survey and a poll is that poll results are shared with the audience in real time (beneath the video window), while survey results are not. Survey results appear only in the Analytics window.
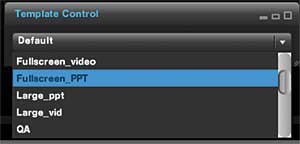
Otherwise, moving from left to right, attendees click the Presenters tab to see the presenters’ bios, the Q&A tab (shown in the figure) to ask questions, the Download tab to download materials (when available), and the Help tab for minimum system requirements. On the bottom left, four icons let the viewer change the presentation display. This enables large-screen video, large-screen PowerPoint, swapping of the video and PowerPoint windows, and the default view that is shown in Figure 11. Presenters have similar control over what the viewer sees via the Template Control widget, on the bottom left of the presenters’ interface, shown in Figure 12.
What mistakes did I make during the presentation? Well, I attend most of the Streaming Media webinars, and one of the first things that Dan Rayburn or Eric Schumacher- Rasmussen always says is, “Ask questions during the presentation, and we’ll answer them at the end.” I forgot to say that and had no questions when the time came, which was embarrassing to say the least. With only 60 or so registrants, I should have anticipated this issue and created a few questions to prime the pump (such as, “Hey Jan, when will your new book be available?”), but I didn’t do this either.
 Before producing your own webcast, attend a few Streaming Media webcasts, pay attention to what pros such as Dan and Eric say at the start, and make sure you have that material covered at the start of your presentations. An even better general rule is to divvy up the presentation and production functions to separate individuals or groups. As a presenter, you’re always concerned with getting your materials together and rehearsed, so many of the presentation details can fall through the cracks.
The WebCaster software is simple enough for one person to operate during the presentation, but having a moderator to set the stage and perform triage on any questions takes a huge burden off the presenter and makes for an overall better webcast. I’m sure most readers knew all of this, but hopefully the reminder is helpful.
Finally, at least for marketing-oriented webinars, don’t underestimate how hard it is to get fannies in the seats. Ultimately, I learned that Brightcove, Inc. held a webinar at the same time as mine. It covered many of the same topics that I did, which no doubt poached at least some of my potential viewers. Though I loved the WebCaster software, you should recognize that there’s a big difference between successfully producing the technical aspects of a webcast and producing a webcast that achieves the desired marketing results.
Synchronizing and Archiving
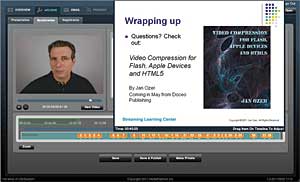 Once the event is complete, it’s time to polish up the presentation and archive it for on-demand viewing. This process is called synchronizing (Figure 13), and if you’re using the same PowerPoint presentation that you originally uploaded, you’ll probably only use the function to trim video from the front and back ends of the presentation. For example, to delete the dead air at the start of the presentation, I dragged the faint green box on the upper left of the timeline to the actual start of the video. This is why there are no slides (the little numbered callouts) beneath this area.
Otherwise, the synchronization process is simple; you play the video and then drag the slides on the timeline to the desired location in the video. You can see the content of the slide by hovering the pointer over the callout. Behind the slide announcing my upcoming book is a list of slides by PowerPoint title, which you can add and delete as needed. When you’re done, click Save & Publish, and WebCaster archives the presentation where it can be viewed at the same URL as the live presentation.
As mentioned, you can easily send emails to your registrants to let them know that the archived version is up. In my case, this was important because it was the only way for the attendees to download the slides. If you make the on-demand presentation generally available, potential viewers will have to register to watch it.
Related Articles
Companies no longer have to stream Windows Media inside the firewall and Flash outside, says enterprise pro.
21 Dec 2011
Two corporate video heavyweights integrate to offer customers a richer set of features.
13 Sep 2011
Also gains messaging and closed captioning, making the platform attractive to more users.
15 Jun 2011
MediaPlatform helped one of Canada's largest event companies take control of its webcasts.
10 Mar 2011
Solution saves enterprises the costs of installing and licensing Flash Media Server on premises.
02 Feb 2011
Companies and Suppliers Mentioned