Tutorial: Building a Remote AWS EC2 Server for Use With vMix
Are you curious as to what the AWS EC2 server is all about and what it can do for you? Let’s say that your current computer setup is subpar or perhaps you need a second unit for remote production using vMix. The EC2 (Elastic CloudCompute) is a viable answer.
In a nutshell, an AWS EC2 Server is a computer that you build virtually through Amazon Web Services. You can make it as powerful as you need or run the very basic version for super-lightweight tasks. More on this here.
Sometimes it's best to roll up our proverbial sleeves and jump right in. That is exactly what I did in 2021 for the North Texas Irish Festival, as described in Anthony Burokas’ June 2021 Streaming Media case study. I was brought in as a remote producer and was also tasked with building multiple instances of cloud computers running vMix.
I had never done this before and still managed to pull it o?. Here is how.
Step 1: Sign Up for and Log Into AWS
First things first: You will need an Amazon Web Services account. Once you have signed up, sign in as a Root user (unrestricted access). This will bring you to the EC2 Dashboard. This is where you’ll build the first instance of your EC2 server.
Step 2: Adjust Network and Security Settings
Before you set up your first instance, you’ll need to adjust a couple of settings. This will help streamline the process.
1. On the left column of the EC2 Dashboard, click on Network and Security.
2. Then head down to Security Groups, as shown in Figure 1 (below). On the top-right of the page click the orange button Create Security Group.

Figure 1. The Security Groups section of the EC2 Dashboard
3. For the purpose of getting your instance going and avoiding network issues, open this security group for all access. I strongly recommend that you change this once you are up and running.
4. After clicking Create Security Group, apply the following settings:
- Name: whatever you desire
- Description: All access
- Inbound rules: All Tra?c 0.0.0.0/0
- Outbound rules: All Tra?c 0.0.0.0/0
5. Staying under that same area (Network & Security), scroll down to Key Pairs. This is where you will enter your instance for the first (and subsequent) times unless you change the password and user information.
6. Choose Key Pairs from the Network and Security tab drop-down, and then click the big orange button at the top right that says Create Key Pair. For Key Pair settings, apply the following:
- Name: whatever you like
- Key Pair type: RSA (Windows)
- Privet Key file format: PEM (open SSH) or PPK (Putty) (I use PEM files.)
7. You will then be prompted to download the file you have just created. Keep it in a safe place and remember where you put it!
Step 3: Build Your Instance
Now it’s time to build your instance.
1. Go to the top of the column on the left and click on EC2 Dashboard. This brings you to the same page you landed on when you initially logged into EC2.
2. Right in the middle of the page is a big orange button that says “Launch Instance” (Figure 2, below). Click it.

Figure 2. Launching your Instance
That will take you to the Launch an Instance page. There are a few options here.
3. First is “Name Your Instance.” This can be anything you desire! Make it a good one.
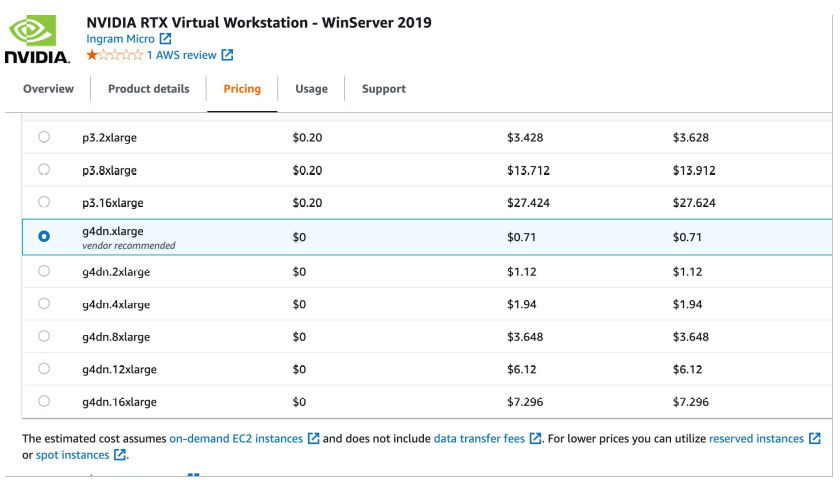
4. Next is Pick your AMI (Amazon Machine Image). What is an AMI? Basically, it is an image already built by a trusted third party. Within the image you will find the server, the drivers, and almost all of the things needed to get your cloud computer up and running. For this Instance, we are going to search for NVIDIA RTX WORKSTATION. This was previously listed as NVIDIA GRID. The Windows version which is called NVIDIA RTX Virtual Workstation - WinServer 2019.
If you look at the details of this Image in Figure 3 (below), it will show you how much it will cost you to run it. This does vary based on location. It usually comes in at about $.71/hr using the lightest graphics package that is available for this AMI (g4dn.xlarge).

Figure 3. Workstation usage pricing
Note that you are charged by AWS only if the instance is running. You can still have it in a stopped state and you will only be charged for the amount of storage you have attached to it. Always remember to stop your instance at the end of a session!
Next up is Instance Type. The AMI Vendor recommends the g4dn.xlarge (4vCPU/j16Gib) to start (vCPU=Virtual CPU).
This being said, this is not based on using vMix. I was burned with this big time during the North Texas Irish Festival! We had many pre-recorded videos paired with 4-8 vMix simultaneous calls going. My instance crashed and I went to my backup plan, which was my home computer. That type of vMix load would be better suited with a 4xlarge version: 16vCU and 64GiB memory. It is possible to change during a show, but it takes time and is not guaranteed.
Not that initially, you may not be able to start an instant type larger than a g4dn.xlarge until you notify support that you would like a service limit increase.
See AWS support for further instructions.
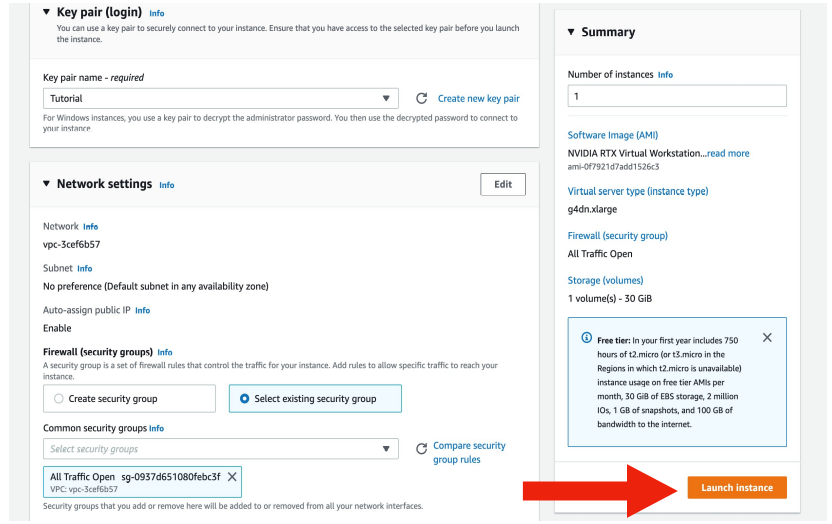
More settings you’ll need to address here (Figure 4, below):

Figure 4. More instance settings to address before launch
- Key Pair: Easy-peasy--we have already set this up! Just pick the Key Pair you have already configured.
- Network Settings: Same scenario as above! Choose “Select existing security group” and then pick the setting you have previously set up.
- Configure Storage: Your instance will come with 30gb storage of general-purpose storage (GP2). This is enough to get started but you will likely need more if you record to the hard drive. That can be done at a later time.
- Advanced Settings: We will not venture into these at this time!
You’re almost there now—time to hit the Launch button!
Step 4: Preparing an EC2 Instance for vMix
Now a few more steps will get you into the instance so you can prepare your EC2 Instance for use with vMix.
- Go back to your EC2 Dashboard and click on Instances.
- Your instance should now be running. If not, right-click on Instance and then click Start Instance.
- Right-click once running and choose Connect.
- Choose RDP Client (Remote Desktop Protocol, Figure 5, below).
- Download the RDP desktop file.
- If you’re working on a Mac, add the instance and then double-click on it. Then copy the Public DNS and paste it into the Computer name when prompted from RDP. If you’re on Windows, just download the RDP file and double-click it.
- Next, click “Get Password.” (Note: Sometimes you have to wait 5-10 minutes after a new Instance is set up before you are allowed decrypt the password.)
- Find the Key Pair file that you saved earlier.
- Copy and Paste Key Pair and click Decrypt.
- Copy password into RDP.
- Click CONNECT.

Figure 5. Choosing an RDP client
A pop-up window opens ith your new Instance running. There are a few more things we should do before we download and install vMix.
Step 5: Installing .NET Framework 3.5
To proceed from here, you’ll need to install .NET Framework 3.5.Here is how:
- Search for “Server Manager” in windows search.
- Open Server Manager.
- On the dashboard under Configure this Server, click on Add Roles and Features.
- In the left column, scroll down to Features.
- Click the first feature in the list, .NET Framework 3.5.
- Click Next.
- Click Install and let that run in the background until it's finished.
Step 6: Enable Audio
Now we need to enable the audio.
- Right-click on the speaker icon at the bottom right of the screen.
- Click on Sounds.
- A pop-up window opens. Just let that go and close the sounds box.
You should now have audio available
Step 7: Set Up a Second User
The next thing you’ll need to do is set up a second user with a Name and Password you will remember. That way you will not have to go through the Key Pair process every time.
- Do a Windows search for user.
- Add user.
- Follow prompts.
Additional Resources
Here is a list of downloads that I keep updated in a file folder on my computer desktop that is hosting the remote session or dropbox for a new install. One of the first things I do when I create a new instance is to transfer the entire folder to the desktop of the instance.
And there you have it! Many steps, but they do move much faster after you get though it the first time.
Enjoy your new Cloud-based computer and up to 100Gbps of networking throughput!
Related Articles
With the release of vMix 27, Windows producers can now get clean Zoom Meeting inputs in vMix. The best part is that there are no additional upfront or monthly subscription costs to vMix 27users with an HD, 4K, Pro, or Max license. All that is required is to download the Zoom Plugin for vMix. Here's how it works.
07 Jun 2024
Among the key features of vMix 27 are Zoom integration, enabling remote streaming producers to bring in (theoretically) an unlimited number of remote guests, vMix Senior Systems Engineer Heath Barker reports in this interview with Streaming Media's Shawn Lam in the vMix booth at NAB. Barker also does a quick hands-on demo of how the feature works.
29 Apr 2024
vMix Operations Manager Tim Vandenberg and Streaming Media's Shawn Lam discuss multistream encoding via GPU unlocking, SRT output, new mix effects and more in vMix 26 and more in the vMix booth at NAB 2023.
25 Apr 2023
The recent Amazon Elastic Compute Cloud outage and the breach of Sony's PlayStation Network revealed the weaknesses of the cloud
03 May 2011