Telestream Wirecast
There's an old Hollywood joke with the punch line, "but I really want to direct." I'm not sure what the actual joke is, or if it's funny, but the reason I bring it up is that if you talk to writers, most would say, "but I really want to be on TV." Certainly the web and websites such as Livestream and Ustream have made that possible to some degree. But most product offerings lack features such as DVR playback, live green screen, and other effects and capabilities. Well, to all you wannabe broadcasters out there, I have good news and bad news.
The good news is that you can get most of the relevant functionality used by your local TV station by purchasing Telestream Wirecast, which runs on both Mac and Windows machines and costs $449. The bad news? Well, judging from my own experience, you may not look as good on camera as you thought, and those lovely, grubby days of getting to your desk without shaving and/or doing your makeup are definitely over-at least on broadcast days.
As an overview, Telestream Wirecast is a software-only live (or live to disk) video production tool that mixes multiple inputs; adds transitions, titles, and other effects; and produces a stream that you can have delivered by CDNs such as Limelight and Akamai and live streaming service providers such as Livestream, Ustream, Justin.tv, and WebCast-TV. When configured with Wowza Media Server 2 Advanced, Wirecast can serve multiprotocol streams to the iPhone and the iPod touch; to Flash, Silverlight, and QuickTime web players; and to IPTV set-top boxes.
Capabilities
To put Wirecast's capabilities in perspective, think back to the last newscast that you watched. The newscast cut between the anchors in the studio and the reporters in the field, added titles over the video, played canned clips from other sources, and showed a live green-screen shot of the weatherperson (doubtless he or she was predicting more snow and cold for the freakish winter of 2010). Well, Wirecast does all of that and more, and you can run it on a Mac or Windows notebook.
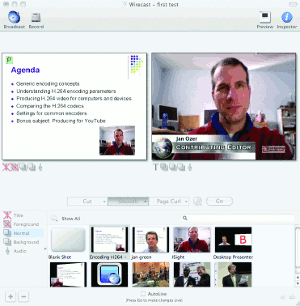
Specifically, Wirecast can accept input from most devices that you can connect live to your computer, including webcams, DV/HDV camcorders, and other cameras via hardware analog inputs. In my tests, which were done primarily on a MacBook Pro, I configured two live feeds, the iSight web cam and a Canon ZR500 Camcorder. I also configured in multiple additional sources that you can see on the shot list contained on the bottom row of Figure 1.
Figure 1 shows the basic Wirecast interface. On the top right is the "live" stream, and on the top left is the stream queued to appear next, or the Preview window, which explains the P in the upper left-hand side of the screen. You can switch feeds one of two ways. If you click the AutoLive check box on the bottom of the interface, simply click on a different scene to switch to it using the configured transition, which defaults to a 1-second cross dissolve. This works well when you're both the talent and the operator, since it only takes one click to switch.
Or, if you uncheck the check box, click on a scene to load it into the preview window and then press the Go button beneath the live window to switch over, again, via the selected transition. If you're the operator switching for other presenters, this is probably the mode you'll use because you can preview the next scene to make sure the configuration is correct before going live.
Wirecast's (Initially Hidden) Layers
Conceptually, think of Wirecast as having four visual layers, which are shown on the bottom left of Figure 1. Titles have an obvious function, while the Foreground is for logos and other overlay graphics. Normal is the most used layer. It contains shots such as your live cameras, disk-based content, full-screen graphics, and the like. The Background layer is for backgrounds that appear when foreground elements don't fill the screen. There's also an audio layer where you configure the input from your audio sources.
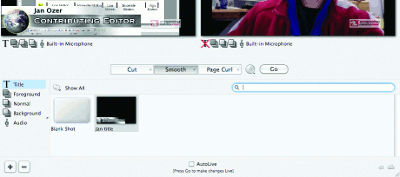
All video layers work separately, and you can switch between them individually. This allows you, for example, to turn a title on or off without impacting the live video beneath it. To control what's being seen on a certain layer, click that layer's title on the left to reveal the available contents, and click the shot that you want to include. For example, in Figure 2, I've selected the Title layer.
- Figure 2
To make a shot disappear, click the Blank Shot button on the extreme left, or cross out the layer beneath either the preview or the live window. Though the Jan Title shot in Figure 2 is selected in the Title panel, I've crossed it off beneath the live window on the right, so it's gone from the frame. If I clicked the Foreground layer, you would see a button labeled SMC logo, which contains the StreamingMedia.com logo you see in the frame. To get rid of the logo, I would click the button to the immediate right of the crossed-out Title button, or click the Blank Shot button in the Foreground shot list.
Initially complicating the operation is a default view that's so streamlined, it doesn't even show the layers on the lower left. This is a Mac program, of course, so clutter is bad, and "less is more" rules the day. Your first step should be to reveal the layers through a menu command. But then it still takes two clicks to change your presentation, one to access the layer, the next to choose the content. Plus, you can't see what's in (or more importantly, what's not in) the layer until you click it, which can get awkward. Fortunately, you can also open up separate mini-windows for each layer, which gets cluttered, but it makes your content much more accessible.
- Figure 3
Pulling Together Your Show
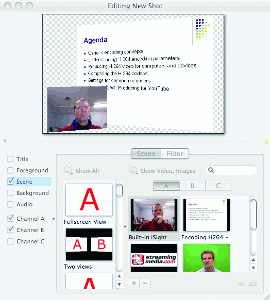
The basic working unit for Wirecast is a "shot," which consists of one input configured in any number of ways. For example, in Figure 3, I have a new shot that will end up in the Normal layer shot list. Though it uses the same two components as the shot shown on the left in Figure 1, it's a different view that I can switch to during the presentation. So if I have five different slides that I want to show with five different picture-in-picture locations, I set each slide up as a shot using the desired configuration and then switch between them during the presentation.
- Figure 4
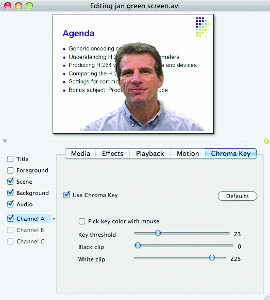
One of Wirecast's strengths is the diversity of the types of media the product can input and switch to and from in real time. One example is shown in Figure 4. It appears that Wirecast overlaid, in real time, a disk-based green-screen video over the PowerPoint slide during this presentation. Though I didn't try this with live video, at least one of the testimonials listed on the Telestream site gushed, "We love it because of the green screen feature," so I presume that it was done and that it worked well.
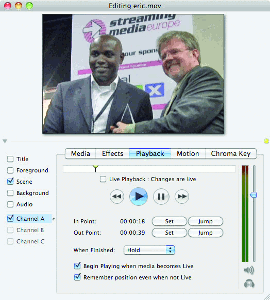
When queuing disk-based video, you have full control over the starting and stopping points of the video, which are again encapsulated into a single shot. So, for example, if you wanted to display three segments of a longer clip during your presentation, you would set each segment up as a shot and then click the shot during the presentation to display just that segment. You can see the playback controls in Figure 5, as I queue a segment of Eric Schumacher-Rasmussen's Reader's Choice awards presentation in London last year.
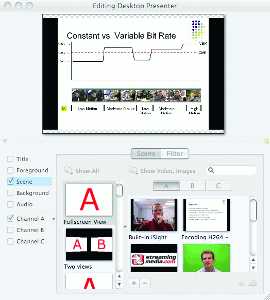
- Figure 6
You can also broadcast the screen (or window) of any computer available on the local network via a free cross-platform applet called Desktop Presenter. Once you load this applet on the other computer, you can add it to the shot list by choosing Media > New Desktop Presenter. If Apple Bonjour is running on both computers, the host computer should find the other one automatically; if not, you can manually input the IP address to locate it, which Telestream simplifies by thoughtfully listing the IP address on the Desktop Presenter applet running on the remote computer (Figure 6).
Desktop Presenter could prove very useful in a number of settings. For example, if your presentation involves multiple speakers, you can preconfigure each speaker's notebook before the shoot and then easily switch over during the presentation. In a single-person presentation, you can use one computer for Wirecast and then switch over to another computer to demonstrate an application.
Note that I ran Wirecast on the MacBook Pro and Desktop Presenter on a HP 8710p notebook, so there don't seem to be any platform-related issues.
Note that the current version of Wirecast can also broadcast the screen of the computer running Wirecast, but it's full-screen only. While you can configure the area presented in the shot edit screen, most users will find it easier to use a different computer linked in via Desktop Presenter to demonstrate an application during the presentation.
Whatever the source, all scenes are saved in a specific project file, and you start each presentation with a clean slate. You can see this operating schema working in a couple of scenarios. If you're the presenter/operator, you build a sequential list of shots that functions almost like a storyboard-some shots are live shots from one of the cameras, some are canned video, some are full-page graphics, and some are of a computer screen accessed via Desktop Presenter. As you go through the show, you click from shot to shot, which should be simple enough for most users.
If you're the operator switching multiple feeds for other presenters, you simply set up each camera view in the shot list and switch between them during the show as needed, pretty much like a live hardware switcher. Whichever schema you choose, the functionality is straightforward and accessible.
- Figure 7
Logos and Titles
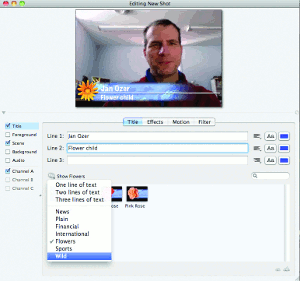
Of course, you're going to want to add titles and logos to your shots, and Wirecast makes that relatively straightforward as well. The title tool is particularly useful, with a range of highly attractive lower-third templates. They're easy to select and to use; just click a template in the bin and type in the desired text; if you don't like the canned font/color combination, you can easily change it (Figure 7). Surprisingly, there are no matching full-screen titles. Of course, you can easily create your own in any image editor, but a selection of full-screen titles that matches the lower thirds would be nice.
The logo tool was functional, but less intuitive, requiring a trip to the manual to figure out how to resize the logo, a common operation that would have been easier using a bounding box. Instead, you have to "Turn off Respect Aspect Ratio and hold the shift-command keys while moving the mouse in the Preview area." Once you get it, though, you get it, and that particular keystroke sequence is used consistently for resizing content throughout the program.
- Figure 8
Distributing Your Video
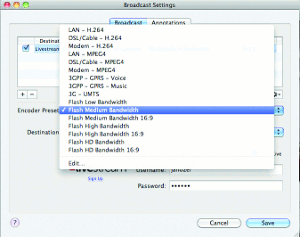
When you start your projects, you should configure your project aspect ratio and resolution and a matching encoding preset (Figure 8). As with most video-related projects, if you see black bars surrounding your video input, it's a sign that something isn't matching and you need to adjust either the aspect ratio or the encoding preset.
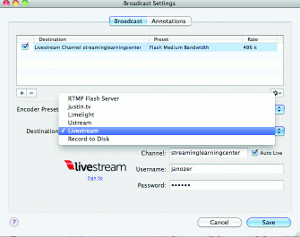
- Figure 9
Once you're ready to broadcast, choose a destination. If you're producing in the Flash format, you can use an RTMP Flash Server, use multiple service providers, or record to disk (Figure 9). If producing in the QuickTime format, you can announce to a QuickTime Streaming Server, transmit to a Built-in Streaming Server, produce unicast or multicast streams, or record to disk.
To test the software, I recorded multiple presentations to disk and then created an account at Livestream, which took all of about 10 minutes.
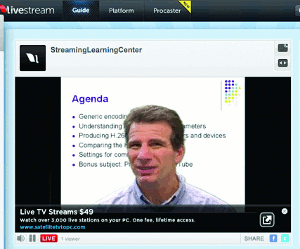
- Figure 10
Once you're all configured and directed, press the Broadcast icon on the top left of the Wirecast interface to start the broadcast. The Livestream integration worked smoothly, and I was live to the world in moments (Figure 10). My first thought was, "Oh, cripes. I need to shave." Sure hope Mom doesn't see that one.
Overall, Wirecast offers an exceptional blend of well-targeted functionality that's unique in the price range, and after you get settled into the interface, it's relatively simple to use. If you're serious about chucking those writing chores to make it on internet TV, or if you have a real job and just want to create some highly polished live or live-to-disk internet broadcasts, Wirecast should be on top of your purchasing list.
Jan Ozer's article first appeared on OnlineVideo.net
Companies and Suppliers Mentioned