Is Online Editor WeVideo Right for You? Read Our Complete Review
 While the desktop video editing market has consolidated into the big four (Adobe, Apple, Avid, and Sony), it's still the wild, wild west in the browser-based online video editing market. I've looked at one online editor previously (Mixmoov), a storyboard-based editor that worked well, but was limited, and glanced at many others. In this review, I'll detail my test drive of the WeVideo editor, which is faster and vastly more functional than Mixmoov, with a timeline-based interface with multiple tracks, superior titling, and more effects and other content, particularly music. I created several projects during my review, the most extensive one here on YouTube.
You can try WeVideo for free, but your max export resolution will be 360p, you'll only get 1 GB of online storage, and you can only export 15 minutes of watermarked video output each month. WeVideo has three for-fee plans, each offering higher-resolution videos, more storage space, and more export minutes. I tested an Ultra account, which regularly costs $39.99/month, though there are some year-end specials in place.
Getting Started with WeVideo
WeVideo is a browser-based Flash application. I tested on multiple browsers on Windows and Macintosh computers in my office and it ran fine with one or two crashes. While the application ran on my Android-based Toshiba Thrive, performance was sketchy and the screen resolution was too small for effective use. WeVideo plans on releasing apps for Android and iOS devices in the first half of 2012.
If you plan on testing the product, start uploading your videos now, since that can take awhile. Once the videos are uploaded, the program is quite responsive, but you can't edit what isn't in the system. I successfully uploaded ProRes, DV, and AVCHD files, and the company says that the product should upload up to 26 different audio/video/still image formats.
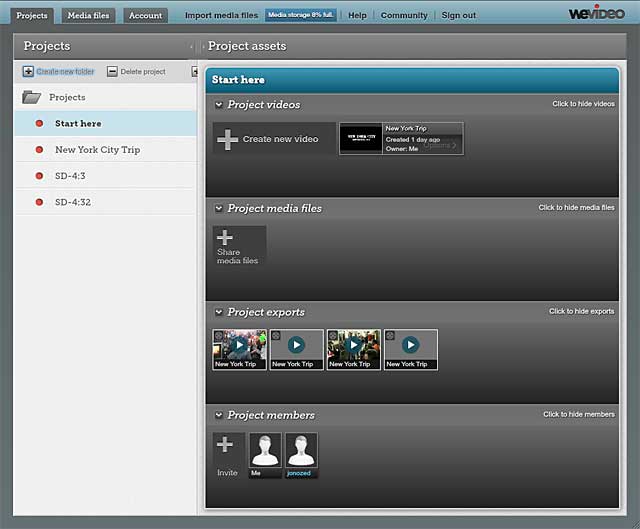
When you first run WeVideo, you start at the Dashboard (Figure 1), which contains tabs for Projects on the left and boxes on the right for project videos, project media files, project exports, and project members. By way of explanation, a project video is what you actually create in the timeline, so each project can have multiple videos. When you're editing collaboratively, the project media box contains assets that you've contributed to the project, so you can keep other uploaded content private. The project exports box contains exported videos while the project members box lists all the editors collaborating on a project

Once you create a new video, you're taken into the movie editor. There are no project settings; projects are all set up at 1080p, with export size controlled by the plan you've selected. All projects have an aspect ratio of 16:9, so if you're working with 4:3 content, you'll see letterboxes on the sides.
Creating a Rough Cut in WeVideo
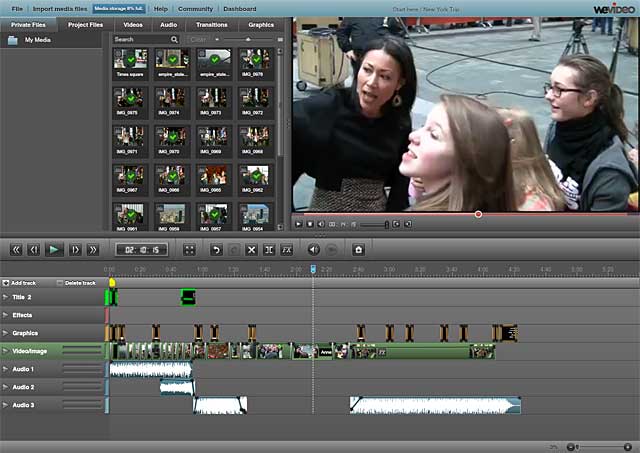
The Movie Editor uses the standard 3-window configuration, with libraries of contents and effects on the upper left, preview window on the right and timeline on the bottom. Buttons on the top left walk you through the various stages of the project, including adding videos, still images, and audio to the project, then transitions and graphics, which includes text and other content.

Projects open with six tracks, three for audio and the Video/Image, Graphics, and Effects tracks, and you can add tracks as needed. You add content to the timeline by dragging it from the media window into the appropriate track on the timeline.
You can place video and still images on any of the three track types, with content placed on the Video/Image track displayed solely at 100 percent of project resolution. Content placed on other tracks is freely resizable and rotatable. Note that audio from video tracks included in the project is included on the same track as the video, with rubber band controls for volume adjustments.
You must place graphics like titles and supplied animations on the Graphics or Effects tracks, not the Video/Image track, which is simple enough. The program has thirty plus effects, most of which you can apply to content on the Video/Image track, but not the Graphics or Effects tracks. What's the purpose of the Effects track? There are four overlay graphics that are called effects (Vignette, Snow, Bad Screen, and Old Film) that you can apply by dragging to a track over the target content, though you can place these four effects on either the Effects track or a Graphics track. For the most part, this all sounds more complicated than it is, and even relative newbies will find themselves up and running very quickly.
In addition to dragging single files into the timeline, there's a useful wizard primarily for slide shows that lets you collect and sequence still images, choose a duration and transition, and, if desired, apply the Ken Burns effect to all selected images. Once content is added to the timeline, you trim by dragging the edges inward or outward, and can move content around via drag-and-drop.
Once you add content to the timeline, WeVideo streams a low-resolution proxy version to your browser, which occurs pretty quickly. The preview shows all the applied effects, transitions, and titles, so preview is nearly instantaneous (although video quality is noticeably degraded). No sweat; in essence, you're building an edit decision list in the browser which is then sent up to the cloud for final rendering using the original uploaded content, which maximizes final render quality. And, since you're editing with low-resolution proxies, you can run the program on relatively low-power computers without the lag often felt when editing HD files on desktop programs.
Polishing Your WeVideo Masterpiece
WeVideo includes over 30 effects, most of which you apply to content on the Video/Image track by choosing the image or video and clicking the FX button. Color correction includes brightness, contrast, saturation, and hue adjustments; it's okay for basic adjustments, but inadequate for color correction. The Ken Burns effect is similarly limited: you can choose the focal point of the pan and zoom, but not starting and stopping points, or whether you zoom in or out. Other effects include dream, emboss, blur, sharpen, and zoom blur, but all are non-configurable.
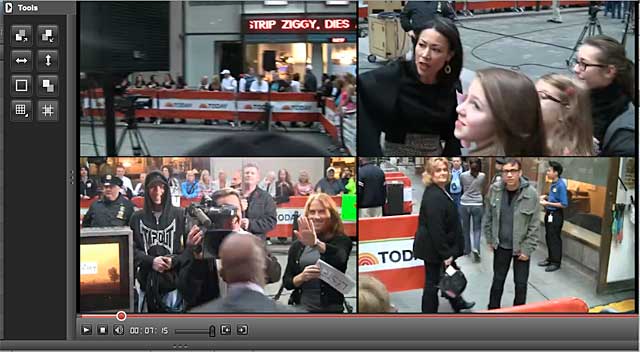
Any video inserted into a track above the Video/Image track is presented in an editable picture-in-picture box that you can move around, rotate, and resize, as well as flip vertically and horizontally, and add a border and/or a drop shadow. You can control the transparency of the video via rubber band controls to create a layered effect, or use multiple tracks to create a video wall like that shown in Figure 3, but there are no green screen controls for chroma-keying.

The titling utility is simple but functional. You add a title by dragging a template down to the Graphics or Effects track. Click the title in the preview window, and you can edit the text. Then click the FX button to access font selection, sizing, color, positioning, and bold, italic, and underline options. As with other graphics, rubber band controls on the title let you fade it in and out or adjust transparency.
In addition to text titles, WeVideo includes simple frames, the text bubbles that you see towards the end of my YouTube movie, animations, and the four previously mentioned effects that you apply on a Graphics or Effects track. I found this abundance of content useful, as I did the 390 background music tracks and multiple sound effects.
Speaking of audio, you control volume on the various audio tracks via rubber band controls which operate identically for graphics. You can see these controls in the aqua audio tracks shown in Figure 4, along with the brown titles in the graphics track.

WeVideo includes over 50 transitions which you add by dragging between the target clips, but only on the Video/Image track. Once inserted, you can click and drag the transition to any duration.
Other Functions in WeVideo
There is no auto-save function, so you'll have to periodically save as you go. If you try to return to the Dashboard with unsaved changes, WeVideo will prompt you to save, and your browser will warn you to save if you try to close the application without saving. Both of these are nice, but don't protect you from browser crashes, which occurred several times during my testing.
To collaborate, you copy a link from the Dashboard and email it to the other editor. Or, you can search for other WeVideo users in the Dashboard and add them directly. Probably the most disappointing deficit in the product is the lack of common editing of a single project by multiple collaborators. Instead, once collaborators join a project in progress, each gets their own custom version of the timeline to edit from there. This avoids accidental overwriting, but makes it tough for two or three editors to work together to craft a single final video.
When you're ready to export, choose File, then Share/Export to open the dialog shown in Figure 5. Uploading to any of the listed social media sites is simple once you complete the credentials process, and you can either export directly to an FTP site of your choosing or to your WeVideo account for downloading from there.
There are minimal export options; you export using the maximum parameters supported by your WeVideo plan, with for-fee options for higher-resolution output. If you're on the Plus plan or higher (720p output) and need lower resolution output for some reason, you're out of luck.
WeVideo: Living with Limitations
In general, I found the program easy to use and capable but some limitations proved problematic in my project. For example, when my 4:3 images were placed on the Video/Image track, I couldn't scale then to remove the letterboxes since you can't zoom into content on that track. I could have moved them to a Graphics track, but then I would have lost the Ken Burns effect and any transition other than a fade, since you can only add effects and transitions to the Video/Image track. This inflexibility is unnecessarily limiting; WeVideo should enable scaling, transitions, and effects on all tracks.
Also frustrating is that you can't have gaps in the Video/Image track; all content automatically snaps to the clip starting point and to the previous content on that track. So, if you create full-screen content on a graphics or effects track, like a video wall, you'd have to fill the Video/Image track beneath the video wall with a video slug. You can create a slug easily enough within the program, but the ability to disable auto-snapping would be nice.
There are many features present in all prosumer desktop editors that WeVideo doesn't offer, such as stabilization, slow and fast motion, green screen, and noise removal, to name a few.
We're in the baby steps phase of the online video editing market. WeVideo has a solid interface and is the closest I've seen to a desktop video editor. Still, if you're a serious producer looking to replace your desktop editor, WeVideo isn't it. On the other hand, for simple projects that you need to access from multiple computers, or that need to incorporate content from multiple sources, WeVideo is worth a look.
Jan Ozer's article first appeared on OnlineVideo.net
Companies and Suppliers Mentioned