10 Insider Tips for Getting the Most out of Sony Vegas Pro 11

Have you upgraded to Sony Vegas Pro 11? Use these tips to get the most out of the new features.
1. To deliver a high-quality video file for posting on sites like YouTube, Vimeo, or your own website, render to the MainConcept AVC format and use the Internet HD 1080p template. This provides a high-quality video, and if you have an OpenCL-enabled graphics card in your render computer, the render will draw on the card's GPU to render significantly faster than other formats.
2. To render a file for Web streaming, render to the MainConcept AVC format and select the Enable Progressive Download checkbox in the Video tab of the Custom Settings dialog box. This results in a file that users can seek through even before the entire file has finished downloading from the streaming server.
 3. In the Render As dialog box, select the Add this render template to your favorites button for each template that you frequently use. Then, when you want to find those templates in the future, select the Show favorites only checkbox. This sorts your list of file formats and templates down to just those you've marked as favorites. Instead of looking through dozens of formats and scores of templates, you now only need to browse through your few favorites to find the one you want.
4. If you have several events on your timeline that are related (for example, as part of a sequence), you'll probably want to be able to control their position on the timeline as a related pack of events. The Grouping function is great for this. However, if you know that you may also need to tweak the placement or trimming of individual events within the related pack (e.g., making minor adjustments to the position of a sound effect event), grouping can be too restrictive. In such cases, use the new Sync Link feature to create a relationship between the events. Sync Link works much like Grouping in that you can move the entire pack by moving the control event, but offers more flexibility to adjust individual members of the pack without adjusting the others.
5. The new OFX implementation for video filters, transitions, and media generators, provides you with greater control over parameter animation. To animate any parameter in these plug-ins, click the individual Animate button for that parameter. If you've animated several plug-ins in the same chain or several parameters of the same plug-in, click the Curves button to view and work on the resulting automation envelopes separately. Click the tag for the effect and parameter you want to adjust in order to sort the envelope view and make it very easy to find the envelope you need for the parameter you're adjusting.
6. To quickly add animated text to your project, click the Media Generators tab and select the new Titles & Text generator from the list. Point to the various presets to find the animation you like, and drag that preset into your timeline. If you decide you want a different animation, choose the new one from the Animation drop-down list in the Video Media Generator window.
7. When using the new Titles & Text generator, use the text box that appears in the Video Preview window to adjust the size and position of your text. This makes it extremely easy to place your text into your video in a way that is most appropriate relative to the content of your video. If the position box does not appear in the Video Preview window, click the Generated Media button for the event that holds your text on the timeline. This opens the Video Media Generators window with the text controls in it, and also opens the position box in the Video Preview window.
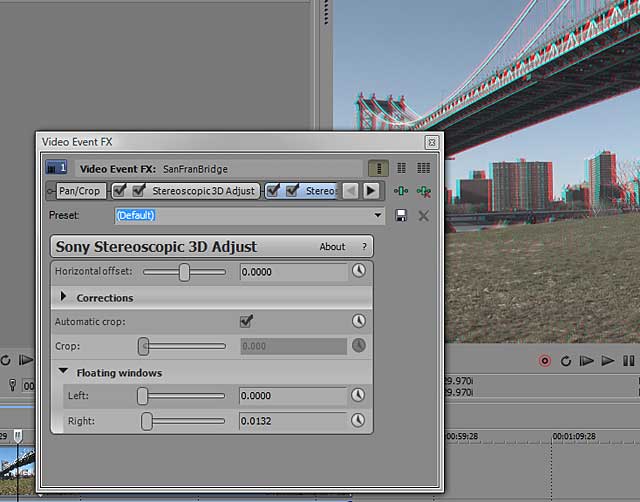
8. If you experience an edge violation in your 3D video clips, the viewer's brain will have trouble making sense out of the placement of objects in the foreground of your scene. To avoid this problem, use the Floating Windows controls in the Stereoscopic 3D Adjust filter to mask the appropriate video stream, thus eliminating the conflicting visual signals caused by the edge violation.

9. When you use the Cookie Cutter filter or the Iris or Cross Effect transitions on 3D footage, the cutout created by these plug-ins can conflict with the 3D placement of objects in your video. To correct such conflicts, use the new Stereoscopic 3D Depth Control to move the cutout behind or in front of screen depth so that it works more effectively with other objects in the video.
10. You can specify whether you want Vegas Pro to process event video effects in your project either before or after any cropping adjustments to the event. Depending on the effect you're using and the pan/crop adjustments you're making, this can have a big impact on the final appearance of your video. Event pan/cropping is simply a part of the video event FX chain and you can place it anywhere within that chain. If you want to pan/crop before any video effects, you don't need to change anything -- this is the "Pre-Effect Mode" and is the default state. If you want to pan/cropping after the effects are applied (Post-Effect Mode), drag the "Pan/Crop" button from the beginning of the effects chain and drop it after the button for the effect. You can set pan/cropping into post-effects mode for some effects in the chain while it remains in pre-effects mode for others.
This article was contributed by Gary Rebholz, product training manager at Sony Creative Software.
Guest Post's article first appeared on OnlineVideo.net
Companies and Suppliers Mentioned